Building Block: Cashew Milk!

I never thought I would be the sort of person to make my own alternative milk (I tried, but I’m secretly twelve and saying ‘nut milk’ makes me giggle), but here we are! Like a lot of people with multiple food allergies, certain staples are beyond me not because of their base ingredients, but due to their additives.

Milk made from almonds, or cashews, or any kind of ingredient like that usually contains vitamins and thickeners to help disguise their original texture and make it ‘feel’ more like milk when we drink it. The problem for me lies in the carrier oils that get that vitamin E into the drink. I can’t say for certain, because most companies don’t dive so deeply into their ingredients lists to post the ingredients of their ingredients (if you get me. That was a clear overuse of the word ‘ingredients’)

So when I turn red and get a bit tender around the face, I have to go back to my old friend: Square One and restrict my diet to see if I’ve added something new to my diet that my body doesn’t like or…the company has changed its recipe (dunh dunh Dunh!) After you do this a couple or ten times, the novelty has a way of wearing off.

Which is why I began making my own alternative milk on my own. In my own house! I feel like a Tudor housewife in far more comfortable clothing. However, with a corn allergy, I should note that you need to be careful where you source your nuts. If you have a more severe allergy, you might get bit by how the nuts are harvested/processes, and even the packaging.

To combat this, I went with a brand I’ve eaten before, and which I more or less trust in terms of packaging consistency. I also always rinse my nuts before I start turning them into milk. I don’t know if that helps, but it certainly can’t hurt, and it makes me feel better. The one thing I’ve learned while Eating Allergic is that I need to take the steps that make me feel more secure. If I don’t, who will?

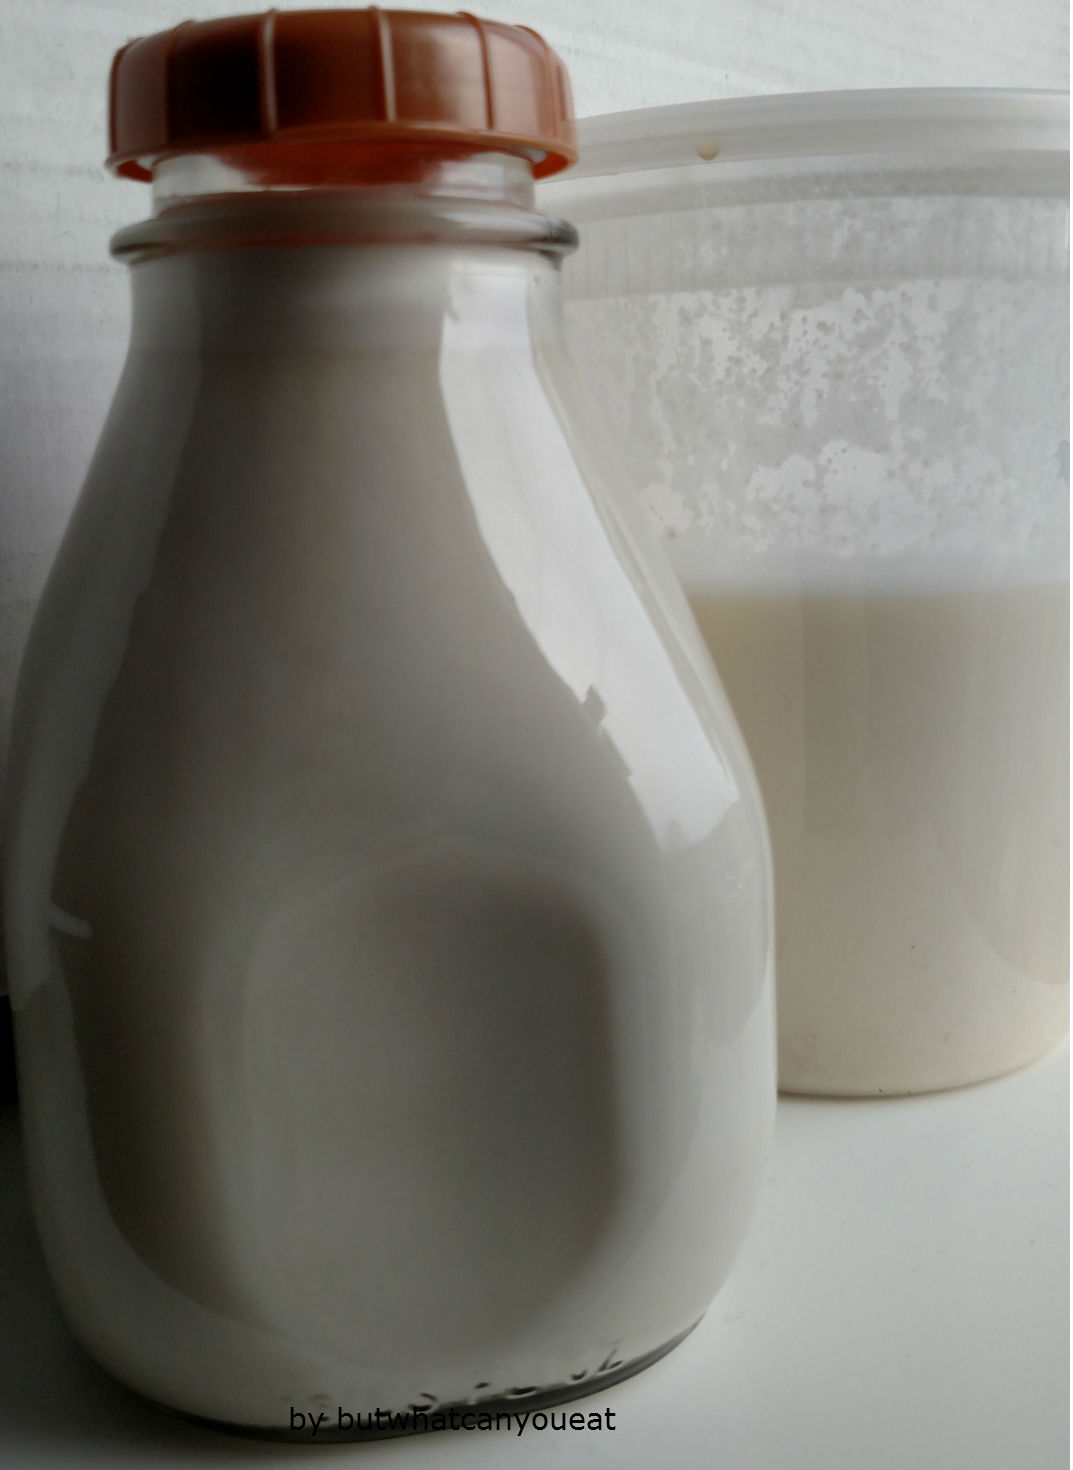
This is cashew milk, which has a mild, delightfully luxurious density and flavor. I like it better than almond milk (too bitter) and I think the texture is leagues above too-watery rice milk. I use it in my coffee in the morning, and for baking.

You’ll Need (Makes 4 cups):

1 cup raw cashews

2 cups cold water (to soak)

1 tsp Honey (or to taste)

½ tsp kosher salt (or to taste)

4 cups cold water (to blend)

Rinse 1 cup of raw cashews, and then put them in a bowl with 2 cups of cold water to soak either for at least 6 hours, or overnight. I prefer overnight, but you do you!

In the morning, drain the water from the cashews, and blend together ½ cup of the cashews with the honey and 1 cup of the water until the nuts are completely blitzed. Pour into a separate bowl or jug with a lid, and repeat the blending with the next ½ cup of cashews and another cup of cold water.

Add the last cup of blitzed cashews into your bowl or jug, and then mix in the last two cups of water. I think this has the texture of a higher fat milk, but I honestly don’t remember what milk tastes like, so your mileage may vary. You can make the milk lighter or thicker depending on the amount of water you use in the recipe. This amount lasts me about a week, or week and a half, and I find it easily scalable for when I need more milk in a recipe.

Additional Comments:

  • I don’t sieve my milk, because I don’t mind the particles leftover from blending, but if you do, then I recommend putting it through a drip coffee filter (let gravity do the work!) or buying some cheesecloth and pouring the blended nuts and water through the cloth prior to adding the last two cups of water, and then squeezing very gently and carefully.
  • You can also definitely use those blitzed particles in a different recipe! Spread it carefully on parchment paper on a tray with a lid. Dry it out in an oven at about 250F and it can be added to GF flours while baking, or used as part of a brittle, and even a pie crust! Just be careful about the amount of liquid
  • I believe you can use this recipe for any kind of raw nut with which you want to try making into an alternative milk, or white rice (I don’t know about brown). Just make sure the nuts are raw!

Coconut Cream Chocolate Cake

You ever need a dessert that doesn’t take a lot of time and comes out looking presentable for company? I don’t often have that need, but I’m eating Christmas at someone else’s home this year, and one of the ways I like to contribute (and ensure that there’s a dessert I can eat!) is to volunteer myself to bring a cake, or some cookies, or a couple of sides, a chicken, and the left hand side of the menu.

Look, I get nervous when I eat out, okay? Two weeks ago, I had half a sandwich at Panera and wound up with a tight throat, three days’ worth of hives, and a depleted Benadryl stash. This is through no fault of the company of course! I had told the servers I have food allergies. This is just the risk I run when I eat outside my own kitchen, even when I’m eating foods I haven’t reacted poorly to before.

So to make myself feel better, and to help me gear up for the holiday cooking marathon, I decided to make a cake. A chocolate cake to be precise, using gluten free flours, and more cocoa powder than is probably good for me. It also let me test out an idea I had for a cake without all the fake butter, which I didn’t have in the fridge, and nut milk…which I had forgotten the night before.

But what makes a cake? The reason we use butter and milk is because we need liquid and fat to create something more unctuous than sugar and flour can provide; it’s the difference between cake and enriched bread. So I vaguely remembered a friend passing me a cake recipe without eggs, butter, or milk that only needed coconut cream (I have looked and looked, but I cannot find the recipe! So thank you, anonymous cake maker, and if I ever find that link again I will be including it here).  I needed to make one big enough to share, but not overwhelming and—since I had the idea that all that coconut would make it way to rich, be able to stand on its own without frosting.

Most cakes, especially gluten-free and plant-based cakes, are just as delicious as fully dairy, egg, and sugar cakes are. Unfortunately, none of those are guaranteed to be allergy-friendly, much less allergy-free!  Like many people, I can’t have baking powder or eggs, vanilla extract, or xanthan gum. But I can have coconut, and that’s all the delightfully fatty goodness I need to make a cake.

The result is a chocolatey delight, rich enough to satisfy anyone’s dessert cravings. It’s quite dense and rich because of the coconut cream, but I didn’t taste any coconut when I tried a piece. Or the morning after, when I tested it again. Or the day after that. Look, I ate a lot of it, and had no complaints.  I made three 5″ cakes, and popped one in the freezer (that’s what I do with practically everything) and it defrosted well. To make it fancy, I shook some powdered sugar over the top, but I think it holds up well on its own. Maybe next time I’ll add an edible flower or two?

You’ll Need (serves 6-10):

1 1/2 cups white sugar

1 13oz. can coconut cream, shaken well and at room temperature

½ tsp. baking soda

1 tsp. salt

1 Tbsp. cold water

4 flax eggs

1 cup cocoa powder

1/3 brown rice powder

1/3 millet flour

1/3 sorghum flour

1/2 cup arrowroot flour

Preheat your over to 375F. 

Make your flax eggs fifteen minutes before starting your cake, and then mix all the ingredients except the flours and baking soda together. In a different bowl, stir the flours and the baking soda together, and then slowly add it into the wet mixture. Stir the cake together until there are no lumps and make sure you’re incorporating some air (try counting to 360 while stirring, if you’re doing it by hand).

Grease two 8”-9” pans, or three 5’ pans (like I did). Pour the cake batter up to a little over the halfway mark in each pan, and let them rest for about twenty to thirty minutes.

Decrease the temperature in the oven to 350F, and put your cake pans in!  Cook for about 30-40 minutes, or until a fork stuck in the middle of the cakes comes out cleanly.

Cool the cake in the pan for ten minutes, before turning the pan upside down on a cooling rack and letting it complete cool.

Additional Reminders:

  • Don’t be alarmed if your coconut cream had tiny white chucks floating in it! Those are okay.  If you open the can and the coconut cream is too hard to mix, spoon it into a microwave safe bowl and warm it up in the microwave for fifteen seconds.
  • If you’re making this cake with regular AP flour, then you don’t need to let the batter rest, and you can take out the eggs entirely. The flax eggs in the gluten free recipe are to provide structure for the GF flours.
  • If you’re in a rush, turn this into cupcakes! They’ll cook faster, and they’re more portable. After about twenty minutes, stick a fork in the center cupcake to test the doneness.

Building Block: Homemade Tomato Ketchup

If you have an allergy, shopping at the supermarket can be a little more fraught with pitfalls than your average consumer, and you can’t always escape that desperate scroll through a laundry list of ingredients by going to a farmer’s market or signing on for a CSA. A lot can depend on how a food item is stored or processed, what it’s been sprayed with, and even what field the food is near (I’m looking at you, raw honey!). In short, finding food that’s safe for you and your family when there’s a food allergy in play can be a lot of ‘trial’ as well as the horrible frustration of a whole lot of ‘error.’

How this works out for me, is that there are many store-made foods I just can’t have, even when the ingredients list works in my favor. Soup stock, alternative milks, and many condiments are on this list, and even though I’m still trying to find some of these items, there is simply no guarantee that I’ll succeed.

Thus, I have brought to you today….a recipe for ketchup! No, I know! Actual ketchup! It’s a thing you can make!  I was also surprised. There are just some foods that you don’t think about cooking up until fate or craving sort of forces you into scouring your bookshelf for incredibly old recipes.

Many of those recipes resembled something more like the Brown Sauce you find in the UK, or like a thickened version of Worcestershire Sauce which wasn’t what I wanted at all. In my head, ketchup is a tomato-based delight, slightly sweet, but with an underlying tart saltiness and a smooth thickened texture. I wanted a sauce I could drag a fry through and have it come out clinging to the potato rather than drip off the side, if you know what I mean.

Finally, I settled on an approximation of all the recipes I had seen, only drastically reduced because if I failed at this recipe, I didn’t want to be saddled with cup after cup of some nasty tasting marinara. So I made some substitutions, did some highly suspect math, and complained endlessly to my friends via text that I was going to burn my ketchup like some city slicker who just arrived on the prairie. I could sense the ghosts of my ancestors rising up to judge me (my grandmother, in particular, just wanted me to keep trying with store-bought.)

Short story, I did not burn anything! (I did take about a ½ inch of skin off my ring finger, but that’s an unrelated incident). And the result was…ketchup! Actual, real-tasting, tried and true tomato ketchup! I felt so accomplished, I can’t even tell you.

But it also impressed upon me how much time and investment making ketchup is. A little over two pounds of tomatoes produced ½ cup of actual ketchup. All the recipes I found called for immense amounts of ingredients, at a cost today which most people (including me) might honestly find prohibitive, not just in money, but in time spent cooking. That’s the trade off with a lot of allergy-friendly products: what others can just pluck off the shelf, we have to devote time and thought and money to achieving.

So this is my admittedly delicious, but scaled down recipe for tomato ketchup. It’s easily adjusted to create more, but I honestly recommend creating a small batch of the stuff—as I did—to make sure you like the flavor and want to devote the time to making the product. I think making this recipe greatly increased my confidence in the kitchen (I made a condiment! Me!). It feels really good to know that I can still have something, even if all the store-bought varieties so far make me itch.

You’ll Need (serves 1):

~2 lbs. tomatoes

water, for boiling

¼ cup apple cider vinegar

1 large clove garlic

1 tsp. white sugar

¾ tsp. salt

1/8 tsp. nutmeg

¼ tsp. onion powder

1/8 tsp. paprika

Wash your tomatoes and add them to a large pot with a lid. Pour in enough water to cover the tomatoes, and then bring them to boil on the stove top. Once the tomatoes have split, remove from the stove and drain the water.

Using a fine mesh strainer and a spoon, or a berry press, press the juice and pulp out of the tomatoes back into the pot you just used. Make sure to scrape the bottom of the strainer to get all the good stuff!  Add in all the rest of the ingredients, and then reduce the sauce on low to medium-low for three hours, or until the sauce resembles ketchup. It should be thick enough to part with a spoon and it should definitely stick to the back of said utensil. Stir frequently to make sure that the sugars don’t burn. Allow it to cool completely before putting it into the refrigerator.

Additional Comment:

Around 2 lbs. of tomatoes yielded ½ cup of ketchup.

If you’re scaling up this recipe, please remember that this is a heavily reduced condiment so all the flavors will be quite concentrated. Less is definitely more!  Also, if you’re worried about the amount of nutmeg, try substituting with mace instead.