Chicken Stir-Fry Lettuce Cups

Who else likes the idea of restaurants better than the execution? It’s always kind of struggle to sit politely, waiting for the service person to decide if they want to give you food or not. You can try to ameliorate the experience by emailing or phoning ahead, but that often adds a layer of social interaction it can be tough to add on, even though it’s necessary. So many people want to be helpful (and are!) but when you’re eating out with allergies, it can be exhausting to explain yourself time and time again.

I don’t honestly have an answer for that feeling, other than to say that one of the ways I try and get around it is through attempting to make my meals at home…not finicky, but a little more special sometimes. Even when it’s a simple dish, I feel like a meal should make you feel included rather than excluded. It’s what sharing food is all about!

When I lived in South Korea, one of the things I loved to do was go out for BBQ. It was so much fun to go out and cook a little meat and veggies, and wrap it in a shiso leaf or some romaine with a ton of gochujang (that’s a fermented hot pepper paste). Just sit around and stuff our faces and talk about our classes, and have a nice night out.

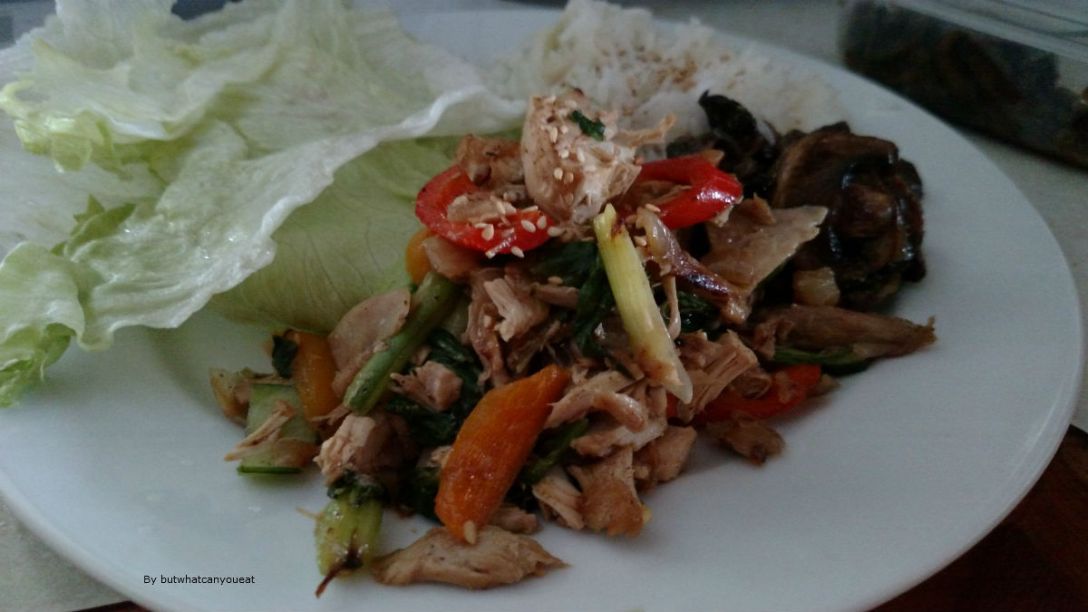
These days, I’m actually allergic to a lot of ingredients in basic Korea cooking (more’s the pity!), but sometimes I still try to capture the feel of it around the dinner table at home. My Chicken Stir-Fry Lettuce Cups are in no way traditional, and they’re really only vaguely in the culinary style of East Asia, but they are a meal meant to share. The red peppers are sweet and the chicken pieces are savory, and I love how warm and full it makes me feel. The process of wrapping the lettuce around my bites of food feels wonderfully interactive, and I like piling on red pepper flakes and white rice and sesame seeds to build the perfect cup.

You’ll need (serves 2 -4 ):

1 – 4 chicken thighs or chicken breasts, cut into chunks

1 red bell pepper, or 2 – 4 small mixed sweet peppers

3 green onions, chopped

1/2 onion, chopped

1/2 tsp ground ginger

1/4 tsp. cinnamon

1/2 tsp. cumin

1 tsp. white pepper

1 1/2 tsp red pepper flakes

Salt (to taste)

Black Pepper (to taste)

2 tbsp. olive oil

1/2 tsp. fish sauce

1 tsp mirin

Lime juice (to taste)

Sesame seeds (optional)

Big lettuce leaves, washed and torn into foldable sizes

First off, chop all your vegetables into chunks you can easily scoop up into lettuce. Then, cut all your chicken into chucks. Heat a wok or frying pan on medium with 1 tbsp. of olive oil, and add the chicken and half the amount of your spices. Make sure you at least season with salt, if you would rather cook all the spices in with the vegetables instead, because other wise the chicken will be bland.

Make sure to cook the chicken completely on both sides, and then set it aside while you cook the vegetables. There should be some great tasting-crust in the bottom of the pan, so add the rest of the olive oil (if necessary. You can definitively use less oil!) and the vegetables and get those pan drippings into your food! This is also where you toss in half or all of your spices, so that everything cooks together. When the onions have softened, add the chicken back in to the pan, and then add the fish sauce, mirin, and lime juice. Be careful with the fish sauce! Too much will overpower the meal and make the food taste a bit strange. The whole cooking process shouldn’t take more than thirty minutes.

Serve family style with white rice, the lettuce leaves, and a good pinch of sesame seeds. I also like a swirl of sesame seed oil right at the end, but it’s not necessary. If you can have hot mustard, sweet chili sauce, or chili oil, these make excellent toppings as well.

Additional Comments:

  • If you can use soy or coconut aminos as a soy-substitute, then add about 1 tsp. when you splash in the mirin, instead of the fish sauce.
  • If your meat is bone-in (as mine was) cook them whole and then set them aside and shred the meat before adding it back in. If you’re making this vegan, I recommend using a squash that doesn’t lose its shape, such as pumpkin or butternut squash!
  • Once again, if you’re having lettuce or any type of leafy green, make sure you know the farmer doesn’t use corn-based cleansers, fertilizers, or sprays in their agricultural cycle. These vegetables have a high water content and people with even simply a moderate corn allergy can be affected if ingested! (Oh the sore throats I have had!). Get them from a farmer’s market, or grow them yourself, but always use caution in the supermarkets, and remember: What works for one allergic person might not work for the next. Be cautious!

Peppery Potato and Leek Soup

Look, I love soup. I just do! I make a lot of broth, I spend a lot of time figuring out ways to use it, and if it’s not in a sauce, then it’s definitely going to show up in a soup later on. I can’t help it! It’s so easy and filling, and I don’t think it’s too much to say that, when you start staring into the cupboard, wondering what you can possibly make with what you have left…soup is going to be the answer almost every time.

This soup, when hot, is more of a winter/fall menu item, where you could maybe stretch into a particularly cold early spring. If served cold, I think it could be a passable Vichyssoise in the spring and summer months, though I confess it’s not my go-to summer dish (that would be strawberries and chicken salad). It’s very simply, requires nothing much from the pantry, and you can beef it up with anything from a good piece of toast to a pat of butter to a smattering of chopped green onion. I add more pepper, which possibly says something about me as a person.

You’ll Need (serves 2 – 4):

6 small potatoes or 4 large ones, peeled and chopped

1 – 2 large leeks, cleaned and chopped

1/4 cup onion, chopped

2 tsps white pepper

2 tsps black pepper

1 – 2 bay leaves

3 cloves roasted garlic

3 tsps salt

4 cups chicken broth

1 Tblsp olive oil

Get a large pot with a lid and heat the pot on medium-low with the olive oil. Add the leeks and onions, salt and peppers, and begin to wilt them, stirring occasionally. Once they begin to soften, add in the roasted garlic and smush them all together, stirring for two minutes until you can smell the garlic.

Add in the bay leaf, the potatoes, and the broth. Then, bring it to boil and simmer it with the lid covered for about twenty – thirty minutes. Check the potatoes occasionally by sticking them with a fork to see if they’re done. Once they’ve started to crumble, get a potato masher out, or a large spoon, and mash the potatoes in the broth. This makes the dish look creamy while still preserving a bit of texture, so that it’s not entirely smooth. Stir it up, remove the bay leaf, and serve!

Additional Comments:

  • A lot of traditional Leek and Potato soups add heavy cream or sour cream as an ingredient, to make a very luxurious, silken soup. I don’t honestly think it needs this, both because of my allergies and also because I don’t like just adding things like that to soups. I prefer them as personal add-ons, a dollop of non-dairy sour cream or yogurt here, a pat of butter there, so that you can enjoy this soup in the same way you might enjoy a baked potato.
    • If you do want to add dairy, or a non-dairy substitute, reduce the amount of broth by one cup and then add in the dairy close to the end of the cooking time.
  • If you like blended soups, take the pot off the hob and let it cool for a few minutes. Depending on the size of your blender, either carefully ladle the whole thing into the blender, or blend half the soup and then half again.
  • This can easily be made vegan by either substituting a vegetable broth or simply using water and upping the amount of spices/herbs and salt.

Cucumber Tomato Salad

Sometimes what you need is a quick, bright splash of acid with a decent crunch, a salad to complement something fatty like lamb, or heavy like a red Thai curry. Also, sometimes you realize you have the end of one sad English cucumber and a box of cherry tomatoes you forgot about and it’s time to either fish or cut bait. And lo! A salad is born!

Winter is not my prime season for salads. If you live somewhere without the darkest days of the year (Say…California where it gets down to fifty and people reach for their woolens) you might not have the same urge to eschew all cold foods and sink into soups, stews, and baked sweet potatoes until you’re as fluffy as the mashed potatoes you just ate. I know they’re good for me, but they’re cold, and I’m cold; my core temperature is going to win out every time.

But when the weather starts warming up, my fickle eye turns towards fresh vegetables once more. This can be a bit tricky (when isn’t it when eating with food allergies?) because a lot of fertilizers or sprays that extend the life of fruits and vegetables can be derived from corn or soy. If you have a sensitive allergy, the produce section is always a minefield.

I don’t have a dedicated vegetable garden, so I rely on my local supermarkets. So far, it’s been without any incident. I’m always careful to go for foods that have some dirt on them, a sign that they probably haven’t been washed or sprayed with something to make them more attractive, and if there’s a rind I generally don’t eat it, even if it’s edible. Thus, I can still have apples and citrus fruits.

In regards to tomatoes and cucumbers, I’ve had good luck. I generally get tomatoes on the vine, though in this case we had a punnet of cherry tomatoes, and the cucumber came from Trader Joe’s so I felt a little better about my chances. As always, approach food from new places with caution until you’re sure you won’t be affected.

Back to the food, this salad has good sharp flavors that wake my tongue up from its winter slumber, and the acid from the rice wine vinegar makes a fantastic complement to the more subtle flavor of the cucumber. I like it with rice and curry, but you could also have it alongside a sweet potato and garlic spinach, or Lemon Paprika Chicken and rice stuffing. It punches up a heavy dinner or makes a great addition to a light lunch. I hope you like it!

You’ll Need (serves 2 -4):

1 English cucumber, diced

2-3 medium tomatoes or a good handful of cherry tomatoes, diced or sliced in half

2 – 3 Tbsp. olive oil

2 Tbsp. Rice Wine Vinegar

1 clove garlic, minced, or a good shake of garlic powder

1 green onion, diced (optional)

A good shake of sesame seeds (optional)

Salt and Pepper

Cut up your vegetables, and place them in a bowl or container with a tight lid. Add the oil, vinegar, salt and pepper. Close the lid on the bowl and give them a good shake so that everything mixes easily. Can be served immediately, or placed in the fridge to marinate. Lasts about a week, but I would recommend taking it out of the fridge a few minutes before serving, to allow the olive oil to become liquid again.

Honey Lemon Chicken

You know what’s fabulous? Chinese food.

The sheer size of China allows for a breathtaking amount of culinary diversity, from hot and spicy to sweet and delicate. Since we had a big family, we often had to go somewhere that would accommodate a large crowd, and the local Chinese restaurants filled that bill admirably. When I was a kid, I would look at the intricate mooncakes and family style dishes with badly suppressed curiosity.

You just could get so many things! You could order three or four dishes, and they were all something new with flavors I didn’t see at home (I inherited my adventuresome palate from my mom, really. She had a wok and a dream, but the eighties weren’t a great decade for spices in rural Oregon!) But the Chinese restaurants? Absolutely had our backs. Not only that, they had tea in little cups and, I mean, I was a kid, but being out with the family with pretty tea sets and a shared meal felt so delightfully fancy that to this day I gravitate to Chinese restaurants when I feel like a special meal.

Of course, now, most of the menu is off limits to me. Eggs feature in a lot of the dishes, many of the sauces, etc. use cornstarch or actual corn, there’s malt and/or barley in some of the vinegars, and it all uses soy (which I can maybe have once a month and then walk around looking sunburned), and then there’s the surprise peanuts lurking in the garnishes… What used to be fun is now a rather stressful experience requiring a lot of prep work and kitchen communication. So, when I want something to remind me of good times and family outings, I make my own approximation of a Chinese take out!

As you might have noticed, I’m a big fan of chicken and the way it tastes. I also love lemons. The recipe I have today is loosely based on the Orange Chicken recipe from The Woks of Life, a family-run food blog you’ve probably already heard of! And when I say ‘loosely’ I mean ‘exceptionally loosely.’ A ‘glancing acquaintance.’ The ‘We were at school together’ of a common effort at recipe making, because those guys have their culinary act together and I’m just coming up with stuff I like to eat that will please the family and won’t kill me. Or them, really.

So instead of cornstarch, we have tapioca. Instead of breading, I grilled the chicken, and instead of oranges, I used lemon juice. I haven’t been able to find a sesame oil I can use, so I just went with olive oil, and then I reconfigured the spices to meld with what I had on hand, and added some red peppers because I thought they bulked up the meal.

I liked the tangy sauce that resulted, and the way the honey gave the dish a more caramelized flavor. I liked how the spices warmed my stomach and the chicken was tender and juicy (which is difficult when all you have is the chicken breasts you found lodged in the freezer!)

You’ll Need (Serves 2 – 4):

To prepare the chicken:

2 – 4 chicken breasts or thighs, sliced into chunks

1/2 tsp. olive oil

2 tsps. Mirin (I can’t find a Shaoxing wine that works)

1/4 tsp cinnamon

2 cloves crushed garlic

1/4 chopped onions, or 2 tsps. onion powder

Salt and Pepper to taste (I used black pepper, because again, no white pepper yet)

Instructions: Chop up the chicken, and then put it, along with the spices, vegetables, and oils, into a ziplock bag and let it marinate in the fridge for at least 30 minutes to an hour depending on how much chicken you’re using.

For the sauce:

Juice of one whole lemon

1-2 tsps. fish sauce (this and mirin is my substitute for soy)

1/4 cup chicken stock

1-2 tsps. honey

1 tsp. red chili flakes

1 tsp. tapioca starch

Salt and Pepper to taste

Optional:

1 green onion, chopped

1/2 red pepper, chopped

1 – 2 heads of bok choy, chopped

To Make:

Put all the ingredients of your sauce into a bowl and stir in the tapioca starch with a fork. That way you can avoid little bumps of unwanted powder.

Heat a frying pan or wok with some olive oil on medium heat, and add your marinated chicken. Cook the chicken, turning once, until the bottom of the pan begins to develop a crust, and then add your vegetables. After the vegetables begin to soften, but not crisp, add in your sauce and stir gently to cover the meal. Cook everything together until the sauce easily coats the back of your spoon or spatula, and it’s nice and bubbling.

I like to have it with rice and a nice serving of garlic spinach or asparagus. The sharpness of the lemon pairs well with the melting sweetness of the honey, and the dish perks up my rather dreary not-quite-spring week. While it’s nowhere near the skill level of those Chinese restaurants in my memory, I feel like this is a good way to reincorporate the flavors I miss from when I was young. And, hey, if you can go and eat at your local Chinese restaurant today, do it for me, okay? I’ll live vicariously through you!

Lemon Paprika Chicken

The thing I like about chicken (Besides the fact that blood tests show I am very, very deeply not allergic to it) is its versatility. You can make a chicken in such a variety of ways and to so many tastes and budgets that it becomes the star of any meal.

An entire chicken is an expense–especially these days–but it’s also extremely good value for money. It feeds an entire family for a number of days, and the bones make broth to extend that deliciousness even further. My mother used to make a chicken for work for her (as she says) for at least a week and beyond, and I say good for her!

This is a recipe I make a lot for my family, using spices and herbs I’ve tasted before and can safely consume (the less said about the Smoked Paprika Debacle of 2019 the better!) so I hope you enjoy as it as much as I do.

You’ll Need (serves 4 – 8 people):

1 whole chicken, giblets removed

1 Tbsp. salt

1 Tbsp. black pepper

1 lemon, peeled and halved

3 tsp. paprika

2-3 cloves of garlic

1/2 onion

Olive Oil

1 large baking dish

Preheat your oven to 375F.

Get out a large baking dish and cover the inside with aluminum foil. Pour in a 1/2 tsp. of olive oil.

Take your whole chicken out of its wrapper or bag, and give it a good swipe with some water, and then pat it dry with some paper towels. If you want to make the skin a little more tight, or it’s got some feather remnants, rub the skin with a little salt and then clean it off again (or else the chicken will be too salty!) Now, check inside the chicken for that little bag of giblets. If it’s there, pull it out and set it aside on a napkin.

Place your chicken breast-sides up in the baking dish, and tuck the points of its wings under the body to help prevent burning. If you can’t, don’t worry about it, but it does make cooking a little easier.

Wash your hands! (Always wash your hands multiple times when dealing with chickens. It’s just good food safety practice!)

Peel your lemon, tear it in half, and then put the lemon, the garlic cloves, and the onion up inside the chicken. This will make dinner very flavorful, and imbue the meat from within.

Now, cover the outside of the chicken with the salt, pepper, and paprika. Then, go over the entire top of the chicken with a medium-thick layer of olive oil. Picture about 1/3 of a cup or so.

At this point, if you want, you can slice up some carrots and celery and place them around the chicken. They’ll cook together and make an excellent side dish! I do that often, as you can see from the picture, but I prefer to roast my potatoes in another dish, because I don’t like the texture when they cook alongside the chicken.

Place your baking dish full of chicken into the oven and cook from 1 1/2 to 2 hours at 350F. You’ll know the chicken is cooked when you poke the skin with a fork and the juices run clear. If you have any concerns, shove it back into the oven for fifteen minutes and then check it again. There are no heroes in undercooked chicken! There are only trips to the doctor’s office.

After enough time has passed, take the chicken out of the oven, and set it on a trivet to cool, and let it rest for about 5 minutes. I don’t know why, but letting meat rest out of the oven is supposed to allow it to relax and retain more of the juices still inside the meat. Cut the meat from the bones, and serve with hasselback potatoes or roasted sweet potato bites, and a good helping of peas!

Additional Comments:

If you don’t have a lemon, substitute Lemon Thyme, which gives the chicken a really nice, light flavor

If your supermarket’s butcher cuts up chicken for free, you could do this recipe with half a chicken, or two quarter pieces. Just adjust the cooking time to about an hour, and check on it often

Throw out the oily herbs and vegetables, etc. you cooked with, but pour the cooking liquid left over in the pan into a bowl. You can stick it in the fridge, and then add it to the stock pot when you make broth later!

Vegan Pesto Pasta: The Oregonian Treat

All right, that isn’t a thing, and no one other than me probably remembers that Rice-A-Roni jingle, but the title made me laugh, so I’m using it. Ha!

I’m told traditional pesto has a great deal of cheese in it, and reading the labels of the little jars in the supermarket certainly bears that out. I’ll be honest, I bet it’s fabulous (my mother certainly agrees!) but since I can’t have it, I decided to come up with a version that would taste good to me and my family members whose bodies work properly. It’s been taste-tested numerous times as a quick, easy meal for a weekend lunch or dinner, when all anyone really wants to do is poke someone else until they’ll do the cooking. Got 10 minutes? You got a meal!

You’ll Need (serves 6):

1 bag of fresh spinach, washed and dried

1 big handful of fresh basil leave, washed and dried, or 2 Tbsps. dried basil

1/2 cup sunflower seeds, roasted in their own oil

1-2 large cloves of garlic

Juice from 1/2 of a lemon, or about 2 Tbsps.

Salt and Pepper to taste

Olive Oil (I tend to use 1/3 – 1/2 cup)

Put all the ingredients, except for the oil, into a food processor or blender, and turn the machine on to high. While it’s running, pour in olive oil. If the mixture begins to stick high up the sides, stop the machine, and push down the concoction so the blades can reach it. Turn it back onto high and keep adding olive oil until the whole thing looking like a sauce. Mine didn’t take more than five minutes (and quite possibly less!)

Turn off the machine and taste test it. Is it too sharp? Add more spinach. Does it need more salt? Add some. Sauces are really things that you have to make to your specific taste. I can’t add nutritional yeast to this, as people often do, because I get different answers to my allergy questions from within the same companies. That’s why I add lemon juice for brightness, but if you can eat nutritional yeast, then feel free to add a teaspoon or two for your own pleasure. Tell me how it tastes, I’ve always been curious!

To serve this, I made gluten free pasta. I drained it, and let the hot noodles cook the sauce a little to draw out the flavors. I didn’t reserve any of the pasta liquid, but if you’re eating traditional pasta, then you should absolute keep back a half a cup or so to meld the sauce with the starches.

I like this recipe. It’s got a wonderfully basil overtone, and I think the spinach gives it heft and body. The lemon and garlic give it an entirely unctuous quality, which I know sounds silly, but that’s how it tasted to me. Sometimes I’ll add shrimp if I’m quite hungry, but usually I just eat it plant-based, just as is. It’s lovely hot, or cold the next day.

Additional Comments:

Just to remind you, if you use bagged spinach, there’s a likelihood that you might accidentally have cross-contamination with a corn-based cleaning wash that they use on the loose leaves. If possible, try to get spinach that’s unbagged or from a brand you’ve used before and not reacted to. I also always thoroughly wash my vegetables, regardless if they say they’ve been pre-washed or not. I know it’s a hassle, but I always want people to be as safe as possible. If you have a very sensitive allergy, then this might not help you, but it works for me!

Citrus fruits can often have corn-based wax on their peels in order to lock in their freshness. I’m doing okay just peeling them and only having the juice or pulp. I never use lemon peel.

Fancy Oven-Cooked Steak Dinner

This one’s for my littlest brother, who loves a good steak dinner.  To be frank, I don’t eat a lot of red meat (I think I ate about…half of that steak in the above picture, and then spent the rest of the night groaning about how full I was!) because I spent some real difficult months where my body reacted to all meats that weren’t chicken with severe disapproval. I’ve gotten out of the habit almost entirely by now, and you’re far more likely to find me roasting a chicken or getting a nice piece of salmon. I do know how to cook a steak, however, and since I have family members that can eat what I cannot, I thought I’d share my recipe with you all!

If you have a lot of allergies, as I do, one of the aspects of food prep for any meal is often not simply knowing your ingredients, but know what your ingredients contain. Minced garlic from a jar isn’t simply minced garlic, but water, salt, and/or citric acid (corn!). Ground flour might have been passed through a grinder which just made Masa or TVP (corn and soy, respectively!) Worcestershire sauce might be perfectly fine in one batch, but contain an unfortunate preservative in the next. It’s the same if you’re eating meat.

If you can, ask your butcher if the steak you’re buying comes from corn-fed cows, especially if you’ve got a severe allergy. If it’s not, ask if they’ve been treated with any kind of preservative. Finally, and this one always makes me feel silly, but persevere and be picky! Try for the steak as far away from touching other foods in the display case as possible. You can always wash them later, of course, with cold water and a quick paper towel pat down to dry them, but it’s good to be assured that your meat hasn’t been cuddling up to something to which you might be allergic.

Steak is kind of a fancy meal, in my opinion, which is why I went all out with fancy hasselback potatoes and then brought us back to earth with simple roasted carrots. It’s something to bring out for the holidays and special occasions. I like my steaks to be spiced, but fairly plain, with good fat marbling through the meat. When you’re cooking a steak, the amount of time necessary depends on how thick the cut of meat is. The steak in the picture above is really thick, so rather than risk burning it, I seared on the stovetop and finished it in the oven.

You’ll Need (1-2 servings, depending on appetite!):

1 steak, about 8 oz.

Salt, to taste

Black Pepper, to taste

¼ tsp. garlic powder, or one cut, raw clove for rubbing

¼ tsp. onion powder

1 tsp. olive oil

Take your steak out and coat it in your seasonings on both sides of the meat. If you’re using a raw garlic clove, rub the cut end all over the garlic (don’t be afraid to press down, but don’t leave little pieces of garlic to burn on it). Leave it alone while you heat up a pan on the stove.

Heat the pan on medium until a little bit of water spritzed on the surface makes the droplets skitter and dance. Then rub olive oil on the steak, again on both sides. Turn on your stove’s fan, and/or open a window because it’s about to get steamy and smoky in there!

Preheat your oven to 350F.

You judge the time to cook by the steak’s thickness; I use the rule of my thumb. If the steak is as thick as your thumb, cook it for 2-3 minutes each on both sides. If the steak is thicker, say as thick as the length of your forefinger, cook it for 3-4 minutes on either side in your pan.

If you’re using an oven-safe pan, transfer the whole thing into the oven and cook it for around 10-20 minutes, depending on how rare you want your meat. If you’re not using an oven-safe pan, then you can use a jelly roll pan covered in aluminum foil or any tray with a lip to cook the meat for the same amount of time. I don’t recommend using a casserole dish, because the sides are too big and might trap moisture you don’t want.

Take the meat out and rest it for 10-15 minutes.  Then get out a good strong knife and serve!

Roasted Sweet Potato Bites

I love sweet potatoes, let’s just begin there. They’re sweet without being cloying, they’re delicious, and you can make them with a minimum of fuss which I deeply appreciate in a root vegetable. You scrub ‘em up, oil ‘em down, stab them a few times, then stick them in the oven until they pop out steamy and fluffy and delicious. Sweet potatoes: They’re great!

But sometimes I want to be fancy, like on Thanksgiving, and when I want to push the boat out a little I go to this recipe for diced, roasted sweet potatoes. They take a little work, but they come out sweet and tangy, and so entirely worth it.

Just remember, if you don’t have a food processor, it’s perfectly fine to cut the sweet potatoes into larger chucks. I find the safest method for me is to turn the potato over by a half or a quarter turn (depending on size) each time I make a cut while holding my knife firmly at an angle.

You’ll Need (serves 2 – 4):

2 – 4 sweet potatoes, cleaned, skinned and diced

1 – 2 tsp. ground ginger

1 – 2 tsp garlic

2 – 3 tsp. sugar

2 tsps. Rice vinegar

1/2 – 1/3 cup of oil

Salt and Pepper to taste

Preheat your oven to 375F

Clean your sweet potatoes with cold water, and then skin and dice them. Use either a food processor or a good sharp knife. Take a large bowl and put the ginger, garlic, sugar, rice vinegar, and oil, salt, and pepper into a large bowl.  Toss the sweet potatoes in the mixture and then pour it out onto either a large baking dish or a roasting sheet lined with aluminum foil.

Put the sweet potatoes in the oven, and decrease the temperature to 350F. Keep an eye on them in case the sugar starts to burn. They should cook, depending on size and amount, from forty minutes to an hour, but make sure to try and turn the potatoes at least once. Once they’re cooked through (you should be able to stick a fork easily in the largest piece) take them out, and spoon them into your serving dish.

Rice Stuffing For the Rest of Us: Gluten-free and Allergy-Friendly

In my family, the side dish you’re always going to see is rice. I can eat it, my mother can eat it, my little brother can eat more of it, but he is only smaller than me in years so that makes sense (seriously, it’s so difficult to be so much older and yet so much shorter!) Even when I could eat practically nothing without reacting to it, I could eat jasmine rice.

But on Thanksgiving—at least in my family—there was never a grain of rice to be seen. It just wasn’t a part of my grandmother’s traditional menu, and changing that line up required an Act of Congress and a two-thirds majority of Aunts. When I was younger, it wasn’t so much of a problem, but now that my food allergies outlaw so many commercial brands and ingredients, putting together a meal that both tastes good and reminds me of my childhood Thanksgivings takes a little bit more ingenuity. Enter Rice Stuffing!

I knew two things I wanted when I set about putting this recipe together: I wanted it to taste like regular stuffing and I wanted the whole dish not to take forever and a day to cook. I think I’ve succeeded on both fronts with this recipe, which creates mound after mound of flavorful rice stuffing dotted with vegetables and herbs. It’s easily adaptable to whatever stuffing recipe you hold dear to your heart as well, and it’s absolutely no muss, no fuss.

You’ll Need (makes 6 servings):

2 cups cooked white jasmine rice

2 carrots, diced small

2 celery stalks, diced small

1 medium-sized onion, diced small

2 – 3 Tbsps. Olive oil

2 cloves roasted garlic, either smushed or chopped

2 tsps. salt

2 tsps. black pepper

1 tsp. red pepper flakes

2 tsps. thyme

2 tsps. sage

1 tsp. rosemary

2 tsps. parsley

1/2 – 2/3 cup broth (use mushroom broth to make it vegan!)

Optional:

1 cup crumbled sausage meat for a heartier dish (cooked with the vegetables)

1 cup button mushrooms, chopped (cooked with the vegetables)

Make the rice ahead of time. When you put the rice into the mix, it should be room temperature, but not cold. You’re also going to need a metal spatula to scrape the bottom of your pan.

Put your oil into a deep frying pan and heat the pan to medium. Dice up your vegetables and add them to the pan, making sure to also add in all the herbs and spices, except for your garlic.  Let that cook down, stirring occasionally, the vegetables soften and the onions become translucent. Add in your garlic and stir until you can smell it.

Push all your vegetables to the sides of the pan, and make a well. Add in your cooked rice, and break up any clumps with your spatula. You want the rice to warm through, so carefully stir it in with the vegetables. When the rice mixture begins to stick to the bottom of the frying pan, creating a sort of brown skin, slowly begin pouring in your broth. You want to add enough liquid that the rice plumps up a bit and comes away from the bottom of the pan, but not enough to drown the rice and make it a solid mushy mess.  Keep turning the stuffing in the pan until every grain of rice shines with the ‘sauce’ you’ve created and the food has begun to stick again. Then, transfer to a serving dish, and it’s ready to go!

Roasted Turkey Breast with Assorted Vegetables

I know, I know! Leftovers from a US Holiday are part and parcel of American food culture, they’re how we extend the warmth of the holiday into the homes of our family and friends. They’re an indication of friendship and love, because it’s our way of showing care.

When the leftovers are simply for ourselves in a small family, however, I feel that the best way to avoid wasting food is to limit the amount of leftovers to a manageable level. After all, with my allergies, I tend to eat the same foods again and again, which can become too monotonous. (When I’m eating with all my family, though? All bets are off!  Hope you like that gallon of stuffing coming your way!) This turkey breast recipe is something I make when it’s not Thanksgiving but I believe it’s perfectly adaptable to any holiday celebration!

Also, a word about turkeys and brine. I don’t brine things, because I don’t trust store bought mixes. So this is an unbrined kosher turkey breast which came out to about two pounds.

You’ll Need (serves 2 – 4):

1 turkey breast, around two pounds by weight

2 tsps. Thyme

2 tsps. Sage

3-4 cloves roasted garlic, smushed or chopped

2 tsps. Parsley

2 tsps. Paprika

2 – 4 Carrots, chopped into thirds

2 – 4 Celery stalks, chopped into thirds

1 Onion, chopped into chunks

¼ cup Sunflower Oil

Salt and Pepper to taste

If frozen, thaw your turkey breast in the refrigerator, and keep it in there until it’s ready to be put into the oven. The Butterball company is a <a href=”http://great resource for timings and methods!

Preheat your oven to 375F.  Chop up your vegetables, and get out a roasting pan big enough to hold all your ingredients without creating too much space. Cover the pan with aluminum foil for easy cleaning, or leave it open, and use the drippings for gravy later! (NB: I am horrible at gravy. So bad it’s a family joke. Mom handles any and all required gravies in the family, because when I make it, she usually winds up salvaging them anyway)

Put the vegetables and a splash of the sunflower oil first. Then, get out a small bowl and combine all the herbs, spices, garlic, and leftover oil into a gooshy mess. Carefully open up space beneath the skin of your turkey breast, but slowly inserting your hand between the skin and the meat. Then, using that same hand, pour in and smooth out the garlic herb mix you made underneath the skin of the turkey breast. This will help your turkey stay moist, and help keep the skin from burning. Once all the mix has been added, put the turkey breast in amidst the vegetables, and add any leftover oil to the top of the turkey breast (doesn’t have to be much!)

Put the turkey in the oven and decrease the heat to 350F. At two pounds, it should cook for about an hour and a half. Once out, let the meat rest for at least ten minutes before cutting it up and serving.

Hot tip: Does the turkey’s skin look a little strange? For crispier, cleaner skin, rub the turkey breast with kosher salt, and then wash it clean in cold water. Make sure to pat it dry before cooking.