Hot or Cold Garlic Spinach

Well, it’s hot. I am not a person who enjoys heat. I mean, you can always warm up, but it seems much more difficult to cool down. I suppose it’s because of where I live, all cool and inviting and rainy…and yes, that lack of sun does come with a corresponding vitamin D deficiency, but! I’m not overheated, and that’s a plus.

And, honestly, when the temperature rises outside, do any of us want to make the temperature go up inside? It just seems like a horrible idea that leads to sweat and hardship and dishes. (Okay, everything leads to dishes, but everything is harder when it’s hot!) That’s why I like hot weather recipes that don’t take a lot of time, that absolutely don’t involve the oven, and that I can eat hot or cold. Enter….Hot or Cold Garlic Spinach!

It’s easy, it’s delicious, and it doesn’t take a lot of a) time or b) ingredients. It’s perfect for summer or the unlooked-for heat snap!

You’ll need (serves 2 – 4):

4 cups spinach

4 tsps. olive oil

2 tsps. rice vinegar

1 tsp. mirin (optional)

2 garlic cloves, diced

1 tsp. sesame seeds

1/4 tsp. sesame oil (optional)

Salt

White Pepper

Get out a frying pan with high sides and heat the olive oil on medium-low. Thoroughly wash and shake out your spinach, and then dice the garlic. Add the spinach, garlic, salt and pepper to the pan, and stir to coat the vegetables in oil as they begin to wilt (about 5 – 10 minutes, depending on heat.) When you can smell the garlic and the spinach has turned malleable, add the rice vinegar and the mirin to the pan. Keep stirring until the steam goes away, and then drain any excess water. If you want to eat it hot, then serve immediately and top with the tiniest amount of sesame oil and the sesame seeds. If you want to eat it cold, toss on the sesame oil and seeds, and then stick it in the refrigerator to cool down and have as a salad!

Additional comments:

If you don’t want to cook the spinach in the pan, you can blanch it first in a pot of boiling water for 2 minutes. You’ll have to cook the garlic in the olive oil in the fry pan separately, then add the spinach, salt, and pepper. Then sauce as directed above!

Chicken Stir-Fry Lettuce Cups

Who else likes the idea of restaurants better than the execution? It’s always kind of struggle to sit politely, waiting for the service person to decide if they want to give you food or not. You can try to ameliorate the experience by emailing or phoning ahead, but that often adds a layer of social interaction it can be tough to add on, even though it’s necessary. So many people want to be helpful (and are!) but when you’re eating out with allergies, it can be exhausting to explain yourself time and time again.

I don’t honestly have an answer for that feeling, other than to say that one of the ways I try and get around it is through attempting to make my meals at home…not finicky, but a little more special sometimes. Even when it’s a simple dish, I feel like a meal should make you feel included rather than excluded. It’s what sharing food is all about!

When I lived in South Korea, one of the things I loved to do was go out for BBQ. It was so much fun to go out and cook a little meat and veggies, and wrap it in a shiso leaf or some romaine with a ton of gochujang (that’s a fermented hot pepper paste). Just sit around and stuff our faces and talk about our classes, and have a nice night out.

These days, I’m actually allergic to a lot of ingredients in basic Korea cooking (more’s the pity!), but sometimes I still try to capture the feel of it around the dinner table at home. My Chicken Stir-Fry Lettuce Cups are in no way traditional, and they’re really only vaguely in the culinary style of East Asia, but they are a meal meant to share. The red peppers are sweet and the chicken pieces are savory, and I love how warm and full it makes me feel. The process of wrapping the lettuce around my bites of food feels wonderfully interactive, and I like piling on red pepper flakes and white rice and sesame seeds to build the perfect cup.

You’ll need (serves 2 -4 ):

1 – 4 chicken thighs or chicken breasts, cut into chunks

1 red bell pepper, or 2 – 4 small mixed sweet peppers

3 green onions, chopped

1/2 onion, chopped

1/2 tsp ground ginger

1/4 tsp. cinnamon

1/2 tsp. cumin

1 tsp. white pepper

1 1/2 tsp red pepper flakes

Salt (to taste)

Black Pepper (to taste)

2 tbsp. olive oil

1/2 tsp. fish sauce

1 tsp mirin

Lime juice (to taste)

Sesame seeds (optional)

Big lettuce leaves, washed and torn into foldable sizes

First off, chop all your vegetables into chunks you can easily scoop up into lettuce. Then, cut all your chicken into chucks. Heat a wok or frying pan on medium with 1 tbsp. of olive oil, and add the chicken and half the amount of your spices. Make sure you at least season with salt, if you would rather cook all the spices in with the vegetables instead, because other wise the chicken will be bland.

Make sure to cook the chicken completely on both sides, and then set it aside while you cook the vegetables. There should be some great tasting-crust in the bottom of the pan, so add the rest of the olive oil (if necessary. You can definitively use less oil!) and the vegetables and get those pan drippings into your food! This is also where you toss in half or all of your spices, so that everything cooks together. When the onions have softened, add the chicken back in to the pan, and then add the fish sauce, mirin, and lime juice. Be careful with the fish sauce! Too much will overpower the meal and make the food taste a bit strange. The whole cooking process shouldn’t take more than thirty minutes.

Serve family style with white rice, the lettuce leaves, and a good pinch of sesame seeds. I also like a swirl of sesame seed oil right at the end, but it’s not necessary. If you can have hot mustard, sweet chili sauce, or chili oil, these make excellent toppings as well.

Additional Comments:

  • If you can use soy or coconut aminos as a soy-substitute, then add about 1 tsp. when you splash in the mirin, instead of the fish sauce.
  • If your meat is bone-in (as mine was) cook them whole and then set them aside and shred the meat before adding it back in. If you’re making this vegan, I recommend using a squash that doesn’t lose its shape, such as pumpkin or butternut squash!
  • Once again, if you’re having lettuce or any type of leafy green, make sure you know the farmer doesn’t use corn-based cleansers, fertilizers, or sprays in their agricultural cycle. These vegetables have a high water content and people with even simply a moderate corn allergy can be affected if ingested! (Oh the sore throats I have had!). Get them from a farmer’s market, or grow them yourself, but always use caution in the supermarkets, and remember: What works for one allergic person might not work for the next. Be cautious!

Peppery Potato and Leek Soup

Look, I love soup. I just do! I make a lot of broth, I spend a lot of time figuring out ways to use it, and if it’s not in a sauce, then it’s definitely going to show up in a soup later on. I can’t help it! It’s so easy and filling, and I don’t think it’s too much to say that, when you start staring into the cupboard, wondering what you can possibly make with what you have left…soup is going to be the answer almost every time.

This soup, when hot, is more of a winter/fall menu item, where you could maybe stretch into a particularly cold early spring. If served cold, I think it could be a passable Vichyssoise in the spring and summer months, though I confess it’s not my go-to summer dish (that would be strawberries and chicken salad). It’s very simply, requires nothing much from the pantry, and you can beef it up with anything from a good piece of toast to a pat of butter to a smattering of chopped green onion. I add more pepper, which possibly says something about me as a person.

You’ll Need (serves 2 – 4):

6 small potatoes or 4 large ones, peeled and chopped

1 – 2 large leeks, cleaned and chopped

1/4 cup onion, chopped

2 tsps white pepper

2 tsps black pepper

1 – 2 bay leaves

3 cloves roasted garlic

3 tsps salt

4 cups chicken broth

1 Tblsp olive oil

Get a large pot with a lid and heat the pot on medium-low with the olive oil. Add the leeks and onions, salt and peppers, and begin to wilt them, stirring occasionally. Once they begin to soften, add in the roasted garlic and smush them all together, stirring for two minutes until you can smell the garlic.

Add in the bay leaf, the potatoes, and the broth. Then, bring it to boil and simmer it with the lid covered for about twenty – thirty minutes. Check the potatoes occasionally by sticking them with a fork to see if they’re done. Once they’ve started to crumble, get a potato masher out, or a large spoon, and mash the potatoes in the broth. This makes the dish look creamy while still preserving a bit of texture, so that it’s not entirely smooth. Stir it up, remove the bay leaf, and serve!

Additional Comments:

  • A lot of traditional Leek and Potato soups add heavy cream or sour cream as an ingredient, to make a very luxurious, silken soup. I don’t honestly think it needs this, both because of my allergies and also because I don’t like just adding things like that to soups. I prefer them as personal add-ons, a dollop of non-dairy sour cream or yogurt here, a pat of butter there, so that you can enjoy this soup in the same way you might enjoy a baked potato.
    • If you do want to add dairy, or a non-dairy substitute, reduce the amount of broth by one cup and then add in the dairy close to the end of the cooking time.
  • If you like blended soups, take the pot off the hob and let it cool for a few minutes. Depending on the size of your blender, either carefully ladle the whole thing into the blender, or blend half the soup and then half again.
  • This can easily be made vegan by either substituting a vegetable broth or simply using water and upping the amount of spices/herbs and salt.

Quick Time Tomato Sauce

Got thirty minutes and some tomatoes burning a hole in your fridge? I have a sauce for that!

Now, I will be honest, this isn’t a fancy sauce. It’s straight up tomato sauce meant to clear space in the fridge and create a quick, hearty meal with maybe three or four ingredients total (not counting the herbs). Which is to say, I think of this sauce as a base for any kind of vegetables or meat that I have leftover, or that maybe wouldn’t be great served on its own, but lets face it: Almost everything is better slapped onto pasta.

This sauce is great for a quick dinner solution. I have a weirdly hard time eating up raw tomatoes, but stick them in a salsa or a sauce and I can slurp it up like nobodies business. The way I make it is very simple, gluten-free, and vegan, but you could add anything you’d like to it to personalize this tomato sauce into your own special treat!

You’ll Need (serves 2 – 4):

1 lb grape tomatoes, or 4-5 medium tomatoes

Around 3 cups of water (or stock)

2 tsps salt (and then more to taste)

2 tsps pepper (and then more to taste)

2-4 cloves of garlic, or 2 tsps. garlic powder

1/4 cup chopped onions, or 2 tsps onion powder

1 carrot, finely shredded

2 tsps parsley

2 tsps oregano

2 tsps basil

Make sure all your vegetables are thoroughly rinsed! This is no time to be cavalier with hygiene, especially if you’ve got food allergies. I have been doing okay with store bought veggies, but stick with a brand you know you can eat safely, either from the store or a farm.

Get out a large saucepan and add your vegetables all in with the water, salt, and pepper. Be liberal with the salt at this stage, because you’ll want to be stingy afterward, and the salt in the water here will flavor your sauce. The water should be about level with the tops of the tomatoes. Turn the burner to medium or medium-low, and bring it up to a soft boil for about fifteen minutes, or whenever the tomatoes start to burst their skins. Take the saucepan off the heat, and let it cool down for a minute.

Toss the entire thing, veggies, water and all, into a blender, and blend it until smooth. If you have a small blender, like I do, just blend it in shifts until everything looks…well, until it looks like a sauce. I like it smooth, but if you want it a bit chunky, then I’m not gonna fault you!

Return the frothy sauce mix to the sauce pan and stir in the herbs. Remember that this is going to boil down by half, so when you taste it, don’t be alarmed if it’s not as flavorful as you might expect. Turn the burner on to about medium-low, and reduce by half, or when it reaches the kind of consistency you like in a tomato sauce, stirring occasionally. Taste it before serving to see if it needs any salt or pepper. It shouldn’t take more than thirty minutes or so, from start to finish!

I chose to pair this with pasta for a quick and filling dinner, but you could easily add this to bulk up a soup, or as a dip for garlic bread. I hope you like it!

Additional Comments:

  • If you are having difficulty sourcing safe food, and need to find a CSA in your area, the USDA has a directory here.
  • If you’re using stock, please make sure to decrease the amount of salt you use, or risk the entire sauce tasting like the ocean!
  • You’ll notice I don’t have any sugar in here. That’s because I’m hesitant to add sugar to savory foods. My workaround for cutting the acid in the tomatoes is the finely grated carrot, which adds a nice layer of sweetness and texture to the sauce. I grate it using my microplane, but you can also just use a regular grater, or chop it up and then blend it with the tomatoes. The choice is yours!
  • A note about sieving: This recipe leaves the tomato skins in, rather than taking them out. If that texture bothers you, and you have a little time, when the sauce is still in the blender, ladle the sauce back into the pan through a sieve. That will get rid of the skins, and will also smooth out the sauce even further.

Savory Breakfast Soup

I think I’ve told you all before, but I don’t actually eat a lot of what we think of in the US as ‘breakfast food.’ Since I can’t have eggs or soy that generally rules out quiches, bagels, omelettes, casseroles…you get the idea. The USA loves its eggs and cheese (for which I cannot blame them!) but it does tend to rule me out.

In general, I eat leftovers from the day before with my morning coffee. I honestly can’t stand the texture of most porridge (oats make me itch!) and since I almost always have cooked rice in the fridge I either end up eating that with fake butter, or a smoothie. I don’t have as much of an appetite in the morning anyway, so a little something that wakes my stomach up works just fine for me.

That being said, one of the things I’ve discovered I can eat (with attendant changes for my allergies) is this Thai breakfast soup I’ve learned from Hot Thai Kitchen. It’s savory without being too rich, and fragrant without being overwhelming. Better still, the rice never becomes mushy or sticky, and it comes together very quickly.

In Pailin’s version, this is ‘Kao Tom Koong,’ made of rice, an onion/cilantro/garlic mash, broth, and shrimp. She also calls for soy sauce, which is not happening, but her version looks delicious and entirely worthwhile. Check out her channel for more recipes!

My version is made out of chicken (I don’t often have shrimp), and I like a lot of rice and slightly less broth. When I made it this time I decided to garnish it with some red pepper and green onion, which were wasting away in my fridge, but the sky’s the limit with regards to things to add. Ginger is delicious, and I think bits of crumbled bacon might be nice as well. It’s so good and so quick, and it uses a very few ingredients. I’m pretty sure I could eat three gallons of it, but I won’t! I will just eat it many times instead.

You’ll Need (Serves 1):

1/2 – 1 cup rice, already cooked and heated for 1 minute in the microwave

1/2 cup – 1 cup chicken broth

1 clove roasted garlic

1 tsp. cilantro

1/4 cup chopped onions

1/4 cup already cooked chicken, chopped (optional)

1 tsp. white pepper

1-2 tsps. fish sauce

Salt (to taste)

1 tsp. red pepper flakes

1 tsp olive oil

Heat a saucepan and cook the onions, garlic, and cilantro with the spices until the onions are translucent. Add in the broth and then the warm rice. If you’re using chicken or some other protein, add that in too, and then warm it all the way through. Pour into a bowl and then garnish with whatever you want!

Lemony Lentil Chickpea Soup

One of the consequences of making cookies when you’re allergic to eggs is that you wind up with a bunch of cooked chickpeas. (Sounds antithetical I know, but the liquid leftover from cooking chickpeas makes a good egg replacement!) When that happens, my horror of wasted food rises up, and forces me to Do Something.

Hummus, however, gets really old after awhile. I mean, there’s only so many times you can eat it and think “I’m having a treat.” So, when I need to make my food into a multi-tasking dynamo, I do the next best thing: I make soup!

The inspiration for this dish today comes from Yotam Ottolenghi, who makes dozens of dishes I would love to try, but sadly can never eat because of my allergies. Lemony Lentil Chickpea Soup is nourishing, tangy, and smoky with cumin, roasted garlic, and onions. It doesn’t take long to put all the ingredients together (I often use pre-cooked lentils and chickpeas, and just cook the onions through. It’s also great for those times when the pantry is looking a little scarce, and you need a solid contender for lunch or dinner.

I can eat way too much of this, frankly, and so it keeps for about a week in my fridge. It can also be frozen in single servings for a month, but the texture becomes a little too mushy for my tastes. However, if you want a pantry staple in your back pocket for those times you have leftovers and don’t know what to do, or simply have odds and ends that don’t quite seem to go together, then I submit this recipe. I hope you enjoy it!

You’ll Need (2 – 4):

2 cups chicken broth

1/2 cup of lentils (dry) or 1 cup cooked

1/2 cup of chickpeas, cooked

1/2 cup onion, chopped

2 tsps. cumin

4 tsps. salt

4 tsps. pepper

1 tsp. red pepper flakes

1 bay leaf

1 small handful of cilantro, chopped

1 handful of fresh spinach (optional)

Juice of half a lemon

2 tsps. olive oil

Heat a saucepan to medium with the oil and onions. Add the garlic, cumin, salt, and pepper to the vegetables and let the onions become translucent. When the onions et al are fragrant, add in the lentils, chickpeas, and bay leaf. Stir together and then add in the chicken broth. Stir again, reduce heat to medium-low and let the soup simmer until it just starts to bubble.

Add in the cilantro and let it wilt. Then, pour in the the lemon juice. Stir and let it heat for about two minutes, and then turn off the heat, and stir in the spinach. Serve hot and delicious!

I like this soup (as you can see from the photo) with a dollop of unsweetened non-dairy yogurt stirred into it, but it’s delicious on it’s own as well. It’s also really good with a nice dense piece of bread!

Additional Comments:

  • If you’re cooking the lentils in the soup, make sure you’ve rinsed them thoroughly in cold water, and then looked them over for small stones. Increase the amount of broth by 2 cups, and add the lentils with the broth second to last after frying the onions, spices, and bay leaf, cook for about 15 minutes before you add the cooked chickpeas. I don’t recommend cooking dry chickpeas and lentils together, as they have different cooking times.
  • If you can’t find spinach safe from corn-based derivatives (often they drink up fertilizers as well as water!) then try a green safe for your consumption. I have been doing okay with the spinach from my grocery store for now, but I also wash it very well and there’s no guarantee!
  • If you’re vegan/vegetarian, you can easily sub a vegetable broth for the chicken, and still have a delicious gluten-free soup.

Building Block: Chicken Broth!

Sheltering in place? Self-isolating? Working from home like you always do? Or, my favorite floating around twitter, merely “exiled to your country estate for the good of the realm?” (No idea who started that, but I like it.) Make broth!

It’s what I’m doing anyway (in between laundry, sweeping, and writing!). If you’ve got time on your hands at home and you need something that is easily freezable, healthy, and soothing to the stomach, then now is the perfect time to start making broth. In our house, it’s usually chicken, since I always have bones and some vegetal odds and ends in the fridge.

I know there are fancier recipes out there, and it seems like everyone has their own personal broth recipe. It can get bewildering! Which one is best? Which one is the most healthy? I don’t really have the answer to that, but I can tell you what I think. To wit, the best broth is the easiest. It should meet your needs for taste and content, and it shouldn’t take a ton of your attention. You should be able to put it in a large pot, turn the heat to medium-low and forget about it for an hour or so.

My recipe for broth works for my family. I find it flavorful, nourishing, and really good for when I don’t feel well, or I need a quick meal. I generally make a huge amount and then freeze some, or use it up throughout the week. Please think of it as a starting recipe, and adjust for your or your family’s needs accordingly!

You’ll Need (Serves 4-8):

1-2 chicken carcasses (I know people who get whole chickens just for broth. I do not understand that, but it must be nice to have money. Just use leftovers!)

1 small knob of ginger, peeled, or 2 tsps. ground

2 tsps. lemongrass, or 1 handful of lemon thyme

3 cloves garlic

1/2 onion

1 tsp. sage

Salt and Pepper

2 stalks of celery

2 medium carrots

1 small handful of parsley (optional)

1 tsp olive oil

Stick all your ingredients into a large pot and let it heat on medium until you hear it begin to sizzle and a slight crust forms on the bottom of the pot. Add a little water and scrape up the crust. Fill the pot with water until it covers all your ingredients, and then let it come to a slight boil. Once it starts to bubble up, decrease the heat to medium-low or medium. You want the top to be bubbling, but not a fast or rolling boil. Leave it for one-two hours or until the water turns into a deep golden broth. I generally let the water boil down by half, because I want to make sure the collagen comes out of the bones and forms that healthy ‘jelly-like’ texture you see in bone broth.

Remove the pot from the heat and let it cool down, and then strain the ingredients out, and pour the broth into lidded tupperware or glass. Let it cool for about five minutes on the counter, and then sling it in the fridge. Basically, anything with a lid. If you want to freeze some, always remember to refrigerate first! Let it cool completely in the fridge to avoid bacterial growth once you start lowering the temperature.

Then, make soup, make rice with it, make a fantastically yummy sauce! We’re all stuck in our houses in the interests of our loved ones and our community. Take a moment to make yourself something nice, and if you have to go out, remember to take care of yourself!

Additional Comments:

  • Lots of people tell you to sieve off the foam that appears when the bones are heated. I never do! It doesn’t matter, and I can’t be bothered. Removing it will make the broth more clear, but I honestly don’t see the point and can’t taste the difference. As a person allergic to eggs, clear broths are rather my nemesis, as a common way to get that clarity is with an egg white ‘float’ to catch all the stray proteins. Always ask if you’re not sure!
  • I sometimes have this for breakfast either to jazz up leftovers (which is what I usually have for breakfast) or as a great way to make a smoother mashed root vegetable puree

Cucumber Tomato Salad

Sometimes what you need is a quick, bright splash of acid with a decent crunch, a salad to complement something fatty like lamb, or heavy like a red Thai curry. Also, sometimes you realize you have the end of one sad English cucumber and a box of cherry tomatoes you forgot about and it’s time to either fish or cut bait. And lo! A salad is born!

Winter is not my prime season for salads. If you live somewhere without the darkest days of the year (Say…California where it gets down to fifty and people reach for their woolens) you might not have the same urge to eschew all cold foods and sink into soups, stews, and baked sweet potatoes until you’re as fluffy as the mashed potatoes you just ate. I know they’re good for me, but they’re cold, and I’m cold; my core temperature is going to win out every time.

But when the weather starts warming up, my fickle eye turns towards fresh vegetables once more. This can be a bit tricky (when isn’t it when eating with food allergies?) because a lot of fertilizers or sprays that extend the life of fruits and vegetables can be derived from corn or soy. If you have a sensitive allergy, the produce section is always a minefield.

I don’t have a dedicated vegetable garden, so I rely on my local supermarkets. So far, it’s been without any incident. I’m always careful to go for foods that have some dirt on them, a sign that they probably haven’t been washed or sprayed with something to make them more attractive, and if there’s a rind I generally don’t eat it, even if it’s edible. Thus, I can still have apples and citrus fruits.

In regards to tomatoes and cucumbers, I’ve had good luck. I generally get tomatoes on the vine, though in this case we had a punnet of cherry tomatoes, and the cucumber came from Trader Joe’s so I felt a little better about my chances. As always, approach food from new places with caution until you’re sure you won’t be affected.

Back to the food, this salad has good sharp flavors that wake my tongue up from its winter slumber, and the acid from the rice wine vinegar makes a fantastic complement to the more subtle flavor of the cucumber. I like it with rice and curry, but you could also have it alongside a sweet potato and garlic spinach, or Lemon Paprika Chicken and rice stuffing. It punches up a heavy dinner or makes a great addition to a light lunch. I hope you like it!

You’ll Need (serves 2 -4):

1 English cucumber, diced

2-3 medium tomatoes or a good handful of cherry tomatoes, diced or sliced in half

2 – 3 Tbsp. olive oil

2 Tbsp. Rice Wine Vinegar

1 clove garlic, minced, or a good shake of garlic powder

1 green onion, diced (optional)

A good shake of sesame seeds (optional)

Salt and Pepper

Cut up your vegetables, and place them in a bowl or container with a tight lid. Add the oil, vinegar, salt and pepper. Close the lid on the bowl and give them a good shake so that everything mixes easily. Can be served immediately, or placed in the fridge to marinate. Lasts about a week, but I would recommend taking it out of the fridge a few minutes before serving, to allow the olive oil to become liquid again.

Honey Lemon Chicken

You know what’s fabulous? Chinese food.

The sheer size of China allows for a breathtaking amount of culinary diversity, from hot and spicy to sweet and delicate. Since we had a big family, we often had to go somewhere that would accommodate a large crowd, and the local Chinese restaurants filled that bill admirably. When I was a kid, I would look at the intricate mooncakes and family style dishes with badly suppressed curiosity.

You just could get so many things! You could order three or four dishes, and they were all something new with flavors I didn’t see at home (I inherited my adventuresome palate from my mom, really. She had a wok and a dream, but the eighties weren’t a great decade for spices in rural Oregon!) But the Chinese restaurants? Absolutely had our backs. Not only that, they had tea in little cups and, I mean, I was a kid, but being out with the family with pretty tea sets and a shared meal felt so delightfully fancy that to this day I gravitate to Chinese restaurants when I feel like a special meal.

Of course, now, most of the menu is off limits to me. Eggs feature in a lot of the dishes, many of the sauces, etc. use cornstarch or actual corn, there’s malt and/or barley in some of the vinegars, and it all uses soy (which I can maybe have once a month and then walk around looking sunburned), and then there’s the surprise peanuts lurking in the garnishes… What used to be fun is now a rather stressful experience requiring a lot of prep work and kitchen communication. So, when I want something to remind me of good times and family outings, I make my own approximation of a Chinese take out!

As you might have noticed, I’m a big fan of chicken and the way it tastes. I also love lemons. The recipe I have today is loosely based on the Orange Chicken recipe from The Woks of Life, a family-run food blog you’ve probably already heard of! And when I say ‘loosely’ I mean ‘exceptionally loosely.’ A ‘glancing acquaintance.’ The ‘We were at school together’ of a common effort at recipe making, because those guys have their culinary act together and I’m just coming up with stuff I like to eat that will please the family and won’t kill me. Or them, really.

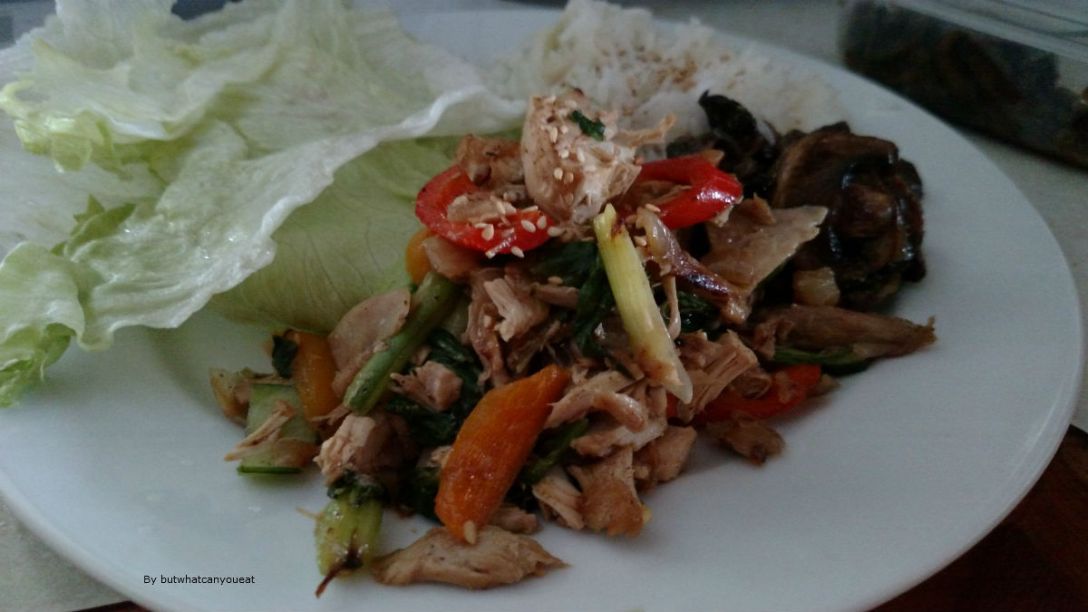
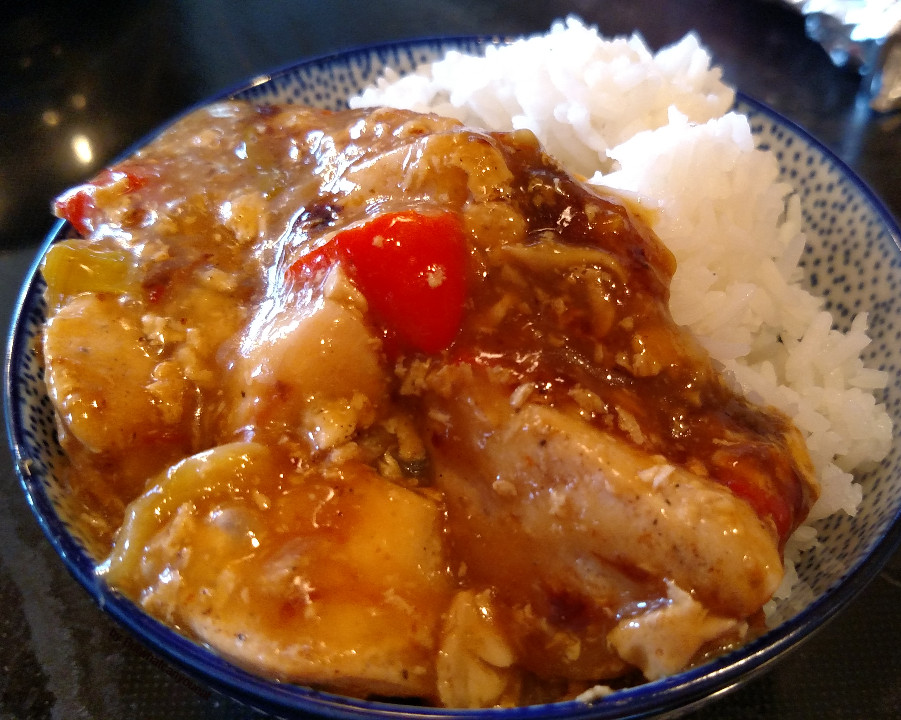
So instead of cornstarch, we have tapioca. Instead of breading, I grilled the chicken, and instead of oranges, I used lemon juice. I haven’t been able to find a sesame oil I can use, so I just went with olive oil, and then I reconfigured the spices to meld with what I had on hand, and added some red peppers because I thought they bulked up the meal.

I liked the tangy sauce that resulted, and the way the honey gave the dish a more caramelized flavor. I liked how the spices warmed my stomach and the chicken was tender and juicy (which is difficult when all you have is the chicken breasts you found lodged in the freezer!)

You’ll Need (Serves 2 – 4):

To prepare the chicken:

2 – 4 chicken breasts or thighs, sliced into chunks

1/2 tsp. olive oil

2 tsps. Mirin (I can’t find a Shaoxing wine that works)

1/4 tsp cinnamon

2 cloves crushed garlic

1/4 chopped onions, or 2 tsps. onion powder

Salt and Pepper to taste (I used black pepper, because again, no white pepper yet)

Instructions: Chop up the chicken, and then put it, along with the spices, vegetables, and oils, into a ziplock bag and let it marinate in the fridge for at least 30 minutes to an hour depending on how much chicken you’re using.

For the sauce:

Juice of one whole lemon

1-2 tsps. fish sauce (this and mirin is my substitute for soy)

1/4 cup chicken stock

1-2 tsps. honey

1 tsp. red chili flakes

1 tsp. tapioca starch

Salt and Pepper to taste

Optional:

1 green onion, chopped

1/2 red pepper, chopped

1 – 2 heads of bok choy, chopped

To Make:

Put all the ingredients of your sauce into a bowl and stir in the tapioca starch with a fork. That way you can avoid little bumps of unwanted powder.

Heat a frying pan or wok with some olive oil on medium heat, and add your marinated chicken. Cook the chicken, turning once, until the bottom of the pan begins to develop a crust, and then add your vegetables. After the vegetables begin to soften, but not crisp, add in your sauce and stir gently to cover the meal. Cook everything together until the sauce easily coats the back of your spoon or spatula, and it’s nice and bubbling.

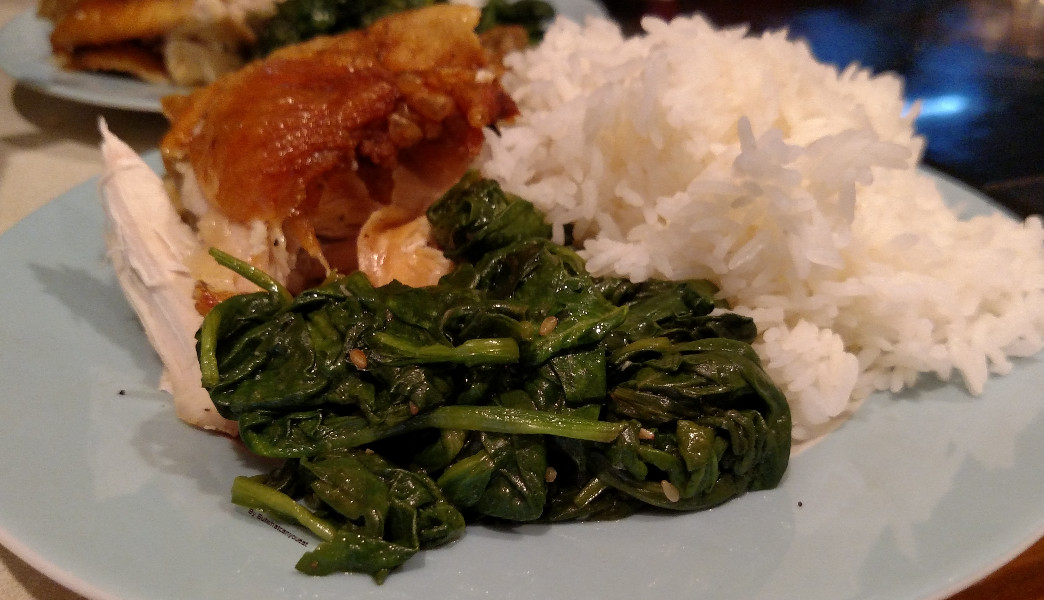
I like to have it with rice and a nice serving of garlic spinach or asparagus. The sharpness of the lemon pairs well with the melting sweetness of the honey, and the dish perks up my rather dreary not-quite-spring week. While it’s nowhere near the skill level of those Chinese restaurants in my memory, I feel like this is a good way to reincorporate the flavors I miss from when I was young. And, hey, if you can go and eat at your local Chinese restaurant today, do it for me, okay? I’ll live vicariously through you!

Lemon Paprika Chicken

The thing I like about chicken (Besides the fact that blood tests show I am very, very deeply not allergic to it) is its versatility. You can make a chicken in such a variety of ways and to so many tastes and budgets that it becomes the star of any meal.

An entire chicken is an expense–especially these days–but it’s also extremely good value for money. It feeds an entire family for a number of days, and the bones make broth to extend that deliciousness even further. My mother used to make a chicken for work for her (as she says) for at least a week and beyond, and I say good for her!

This is a recipe I make a lot for my family, using spices and herbs I’ve tasted before and can safely consume (the less said about the Smoked Paprika Debacle of 2019 the better!) so I hope you enjoy as it as much as I do.

You’ll Need (serves 4 – 8 people):

1 whole chicken, giblets removed

1 Tbsp. salt

1 Tbsp. black pepper

1 lemon, peeled and halved

3 tsp. paprika

2-3 cloves of garlic

1/2 onion

Olive Oil

1 large baking dish

Preheat your oven to 375F.

Get out a large baking dish and cover the inside with aluminum foil. Pour in a 1/2 tsp. of olive oil.

Take your whole chicken out of its wrapper or bag, and give it a good swipe with some water, and then pat it dry with some paper towels. If you want to make the skin a little more tight, or it’s got some feather remnants, rub the skin with a little salt and then clean it off again (or else the chicken will be too salty!) Now, check inside the chicken for that little bag of giblets. If it’s there, pull it out and set it aside on a napkin.

Place your chicken breast-sides up in the baking dish, and tuck the points of its wings under the body to help prevent burning. If you can’t, don’t worry about it, but it does make cooking a little easier.

Wash your hands! (Always wash your hands multiple times when dealing with chickens. It’s just good food safety practice!)

Peel your lemon, tear it in half, and then put the lemon, the garlic cloves, and the onion up inside the chicken. This will make dinner very flavorful, and imbue the meat from within.

Now, cover the outside of the chicken with the salt, pepper, and paprika. Then, go over the entire top of the chicken with a medium-thick layer of olive oil. Picture about 1/3 of a cup or so.

At this point, if you want, you can slice up some carrots and celery and place them around the chicken. They’ll cook together and make an excellent side dish! I do that often, as you can see from the picture, but I prefer to roast my potatoes in another dish, because I don’t like the texture when they cook alongside the chicken.

Place your baking dish full of chicken into the oven and cook from 1 1/2 to 2 hours at 350F. You’ll know the chicken is cooked when you poke the skin with a fork and the juices run clear. If you have any concerns, shove it back into the oven for fifteen minutes and then check it again. There are no heroes in undercooked chicken! There are only trips to the doctor’s office.

After enough time has passed, take the chicken out of the oven, and set it on a trivet to cool, and let it rest for about 5 minutes. I don’t know why, but letting meat rest out of the oven is supposed to allow it to relax and retain more of the juices still inside the meat. Cut the meat from the bones, and serve with hasselback potatoes or roasted sweet potato bites, and a good helping of peas!

Additional Comments:

If you don’t have a lemon, substitute Lemon Thyme, which gives the chicken a really nice, light flavor

If your supermarket’s butcher cuts up chicken for free, you could do this recipe with half a chicken, or two quarter pieces. Just adjust the cooking time to about an hour, and check on it often

Throw out the oily herbs and vegetables, etc. you cooked with, but pour the cooking liquid left over in the pan into a bowl. You can stick it in the fridge, and then add it to the stock pot when you make broth later!