Hot or Cold Garlic Spinach

Well, it’s hot. I am not a person who enjoys heat. I mean, you can always warm up, but it seems much more difficult to cool down. I suppose it’s because of where I live, all cool and inviting and rainy…and yes, that lack of sun does come with a corresponding vitamin D deficiency, but! I’m not overheated, and that’s a plus.

And, honestly, when the temperature rises outside, do any of us want to make the temperature go up inside? It just seems like a horrible idea that leads to sweat and hardship and dishes. (Okay, everything leads to dishes, but everything is harder when it’s hot!) That’s why I like hot weather recipes that don’t take a lot of time, that absolutely don’t involve the oven, and that I can eat hot or cold. Enter….Hot or Cold Garlic Spinach!

It’s easy, it’s delicious, and it doesn’t take a lot of a) time or b) ingredients. It’s perfect for summer or the unlooked-for heat snap!

You’ll need (serves 2 – 4):

4 cups spinach

4 tsps. olive oil

2 tsps. rice vinegar

1 tsp. mirin (optional)

2 garlic cloves, diced

1 tsp. sesame seeds

1/4 tsp. sesame oil (optional)

Salt

White Pepper

Get out a frying pan with high sides and heat the olive oil on medium-low. Thoroughly wash and shake out your spinach, and then dice the garlic. Add the spinach, garlic, salt and pepper to the pan, and stir to coat the vegetables in oil as they begin to wilt (about 5 – 10 minutes, depending on heat.) When you can smell the garlic and the spinach has turned malleable, add the rice vinegar and the mirin to the pan. Keep stirring until the steam goes away, and then drain any excess water. If you want to eat it hot, then serve immediately and top with the tiniest amount of sesame oil and the sesame seeds. If you want to eat it cold, toss on the sesame oil and seeds, and then stick it in the refrigerator to cool down and have as a salad!

Additional comments:

If you don’t want to cook the spinach in the pan, you can blanch it first in a pot of boiling water for 2 minutes. You’ll have to cook the garlic in the olive oil in the fry pan separately, then add the spinach, salt, and pepper. Then sauce as directed above!

Chicken Stir-Fry Lettuce Cups

Who else likes the idea of restaurants better than the execution? It’s always kind of struggle to sit politely, waiting for the service person to decide if they want to give you food or not. You can try to ameliorate the experience by emailing or phoning ahead, but that often adds a layer of social interaction it can be tough to add on, even though it’s necessary. So many people want to be helpful (and are!) but when you’re eating out with allergies, it can be exhausting to explain yourself time and time again.

I don’t honestly have an answer for that feeling, other than to say that one of the ways I try and get around it is through attempting to make my meals at home…not finicky, but a little more special sometimes. Even when it’s a simple dish, I feel like a meal should make you feel included rather than excluded. It’s what sharing food is all about!

When I lived in South Korea, one of the things I loved to do was go out for BBQ. It was so much fun to go out and cook a little meat and veggies, and wrap it in a shiso leaf or some romaine with a ton of gochujang (that’s a fermented hot pepper paste). Just sit around and stuff our faces and talk about our classes, and have a nice night out.

These days, I’m actually allergic to a lot of ingredients in basic Korea cooking (more’s the pity!), but sometimes I still try to capture the feel of it around the dinner table at home. My Chicken Stir-Fry Lettuce Cups are in no way traditional, and they’re really only vaguely in the culinary style of East Asia, but they are a meal meant to share. The red peppers are sweet and the chicken pieces are savory, and I love how warm and full it makes me feel. The process of wrapping the lettuce around my bites of food feels wonderfully interactive, and I like piling on red pepper flakes and white rice and sesame seeds to build the perfect cup.

You’ll need (serves 2 -4 ):

1 – 4 chicken thighs or chicken breasts, cut into chunks

1 red bell pepper, or 2 – 4 small mixed sweet peppers

3 green onions, chopped

1/2 onion, chopped

1/2 tsp ground ginger

1/4 tsp. cinnamon

1/2 tsp. cumin

1 tsp. white pepper

1 1/2 tsp red pepper flakes

Salt (to taste)

Black Pepper (to taste)

2 tbsp. olive oil

1/2 tsp. fish sauce

1 tsp mirin

Lime juice (to taste)

Sesame seeds (optional)

Big lettuce leaves, washed and torn into foldable sizes

First off, chop all your vegetables into chunks you can easily scoop up into lettuce. Then, cut all your chicken into chucks. Heat a wok or frying pan on medium with 1 tbsp. of olive oil, and add the chicken and half the amount of your spices. Make sure you at least season with salt, if you would rather cook all the spices in with the vegetables instead, because other wise the chicken will be bland.

Make sure to cook the chicken completely on both sides, and then set it aside while you cook the vegetables. There should be some great tasting-crust in the bottom of the pan, so add the rest of the olive oil (if necessary. You can definitively use less oil!) and the vegetables and get those pan drippings into your food! This is also where you toss in half or all of your spices, so that everything cooks together. When the onions have softened, add the chicken back in to the pan, and then add the fish sauce, mirin, and lime juice. Be careful with the fish sauce! Too much will overpower the meal and make the food taste a bit strange. The whole cooking process shouldn’t take more than thirty minutes.

Serve family style with white rice, the lettuce leaves, and a good pinch of sesame seeds. I also like a swirl of sesame seed oil right at the end, but it’s not necessary. If you can have hot mustard, sweet chili sauce, or chili oil, these make excellent toppings as well.

Additional Comments:

  • If you can use soy or coconut aminos as a soy-substitute, then add about 1 tsp. when you splash in the mirin, instead of the fish sauce.
  • If your meat is bone-in (as mine was) cook them whole and then set them aside and shred the meat before adding it back in. If you’re making this vegan, I recommend using a squash that doesn’t lose its shape, such as pumpkin or butternut squash!
  • Once again, if you’re having lettuce or any type of leafy green, make sure you know the farmer doesn’t use corn-based cleansers, fertilizers, or sprays in their agricultural cycle. These vegetables have a high water content and people with even simply a moderate corn allergy can be affected if ingested! (Oh the sore throats I have had!). Get them from a farmer’s market, or grow them yourself, but always use caution in the supermarkets, and remember: What works for one allergic person might not work for the next. Be cautious!

Quick Time Tomato Sauce

Got thirty minutes and some tomatoes burning a hole in your fridge? I have a sauce for that!

Now, I will be honest, this isn’t a fancy sauce. It’s straight up tomato sauce meant to clear space in the fridge and create a quick, hearty meal with maybe three or four ingredients total (not counting the herbs). Which is to say, I think of this sauce as a base for any kind of vegetables or meat that I have leftover, or that maybe wouldn’t be great served on its own, but lets face it: Almost everything is better slapped onto pasta.

This sauce is great for a quick dinner solution. I have a weirdly hard time eating up raw tomatoes, but stick them in a salsa or a sauce and I can slurp it up like nobodies business. The way I make it is very simple, gluten-free, and vegan, but you could add anything you’d like to it to personalize this tomato sauce into your own special treat!

You’ll Need (serves 2 – 4):

1 lb grape tomatoes, or 4-5 medium tomatoes

Around 3 cups of water (or stock)

2 tsps salt (and then more to taste)

2 tsps pepper (and then more to taste)

2-4 cloves of garlic, or 2 tsps. garlic powder

1/4 cup chopped onions, or 2 tsps onion powder

1 carrot, finely shredded

2 tsps parsley

2 tsps oregano

2 tsps basil

Make sure all your vegetables are thoroughly rinsed! This is no time to be cavalier with hygiene, especially if you’ve got food allergies. I have been doing okay with store bought veggies, but stick with a brand you know you can eat safely, either from the store or a farm.

Get out a large saucepan and add your vegetables all in with the water, salt, and pepper. Be liberal with the salt at this stage, because you’ll want to be stingy afterward, and the salt in the water here will flavor your sauce. The water should be about level with the tops of the tomatoes. Turn the burner to medium or medium-low, and bring it up to a soft boil for about fifteen minutes, or whenever the tomatoes start to burst their skins. Take the saucepan off the heat, and let it cool down for a minute.

Toss the entire thing, veggies, water and all, into a blender, and blend it until smooth. If you have a small blender, like I do, just blend it in shifts until everything looks…well, until it looks like a sauce. I like it smooth, but if you want it a bit chunky, then I’m not gonna fault you!

Return the frothy sauce mix to the sauce pan and stir in the herbs. Remember that this is going to boil down by half, so when you taste it, don’t be alarmed if it’s not as flavorful as you might expect. Turn the burner on to about medium-low, and reduce by half, or when it reaches the kind of consistency you like in a tomato sauce, stirring occasionally. Taste it before serving to see if it needs any salt or pepper. It shouldn’t take more than thirty minutes or so, from start to finish!

I chose to pair this with pasta for a quick and filling dinner, but you could easily add this to bulk up a soup, or as a dip for garlic bread. I hope you like it!

Additional Comments:

  • If you are having difficulty sourcing safe food, and need to find a CSA in your area, the USDA has a directory here.
  • If you’re using stock, please make sure to decrease the amount of salt you use, or risk the entire sauce tasting like the ocean!
  • You’ll notice I don’t have any sugar in here. That’s because I’m hesitant to add sugar to savory foods. My workaround for cutting the acid in the tomatoes is the finely grated carrot, which adds a nice layer of sweetness and texture to the sauce. I grate it using my microplane, but you can also just use a regular grater, or chop it up and then blend it with the tomatoes. The choice is yours!
  • A note about sieving: This recipe leaves the tomato skins in, rather than taking them out. If that texture bothers you, and you have a little time, when the sauce is still in the blender, ladle the sauce back into the pan through a sieve. That will get rid of the skins, and will also smooth out the sauce even further.

Savory Breakfast Soup

I think I’ve told you all before, but I don’t actually eat a lot of what we think of in the US as ‘breakfast food.’ Since I can’t have eggs or soy that generally rules out quiches, bagels, omelettes, casseroles…you get the idea. The USA loves its eggs and cheese (for which I cannot blame them!) but it does tend to rule me out.

In general, I eat leftovers from the day before with my morning coffee. I honestly can’t stand the texture of most porridge (oats make me itch!) and since I almost always have cooked rice in the fridge I either end up eating that with fake butter, or a smoothie. I don’t have as much of an appetite in the morning anyway, so a little something that wakes my stomach up works just fine for me.

That being said, one of the things I’ve discovered I can eat (with attendant changes for my allergies) is this Thai breakfast soup I’ve learned from Hot Thai Kitchen. It’s savory without being too rich, and fragrant without being overwhelming. Better still, the rice never becomes mushy or sticky, and it comes together very quickly.

In Pailin’s version, this is ‘Kao Tom Koong,’ made of rice, an onion/cilantro/garlic mash, broth, and shrimp. She also calls for soy sauce, which is not happening, but her version looks delicious and entirely worthwhile. Check out her channel for more recipes!

My version is made out of chicken (I don’t often have shrimp), and I like a lot of rice and slightly less broth. When I made it this time I decided to garnish it with some red pepper and green onion, which were wasting away in my fridge, but the sky’s the limit with regards to things to add. Ginger is delicious, and I think bits of crumbled bacon might be nice as well. It’s so good and so quick, and it uses a very few ingredients. I’m pretty sure I could eat three gallons of it, but I won’t! I will just eat it many times instead.

You’ll Need (Serves 1):

1/2 – 1 cup rice, already cooked and heated for 1 minute in the microwave

1/2 cup – 1 cup chicken broth

1 clove roasted garlic

1 tsp. cilantro

1/4 cup chopped onions

1/4 cup already cooked chicken, chopped (optional)

1 tsp. white pepper

1-2 tsps. fish sauce

Salt (to taste)

1 tsp. red pepper flakes

1 tsp olive oil

Heat a saucepan and cook the onions, garlic, and cilantro with the spices until the onions are translucent. Add in the broth and then the warm rice. If you’re using chicken or some other protein, add that in too, and then warm it all the way through. Pour into a bowl and then garnish with whatever you want!

Lemony Lentil Chickpea Soup

One of the consequences of making cookies when you’re allergic to eggs is that you wind up with a bunch of cooked chickpeas. (Sounds antithetical I know, but the liquid leftover from cooking chickpeas makes a good egg replacement!) When that happens, my horror of wasted food rises up, and forces me to Do Something.

Hummus, however, gets really old after awhile. I mean, there’s only so many times you can eat it and think “I’m having a treat.” So, when I need to make my food into a multi-tasking dynamo, I do the next best thing: I make soup!

The inspiration for this dish today comes from Yotam Ottolenghi, who makes dozens of dishes I would love to try, but sadly can never eat because of my allergies. Lemony Lentil Chickpea Soup is nourishing, tangy, and smoky with cumin, roasted garlic, and onions. It doesn’t take long to put all the ingredients together (I often use pre-cooked lentils and chickpeas, and just cook the onions through. It’s also great for those times when the pantry is looking a little scarce, and you need a solid contender for lunch or dinner.

I can eat way too much of this, frankly, and so it keeps for about a week in my fridge. It can also be frozen in single servings for a month, but the texture becomes a little too mushy for my tastes. However, if you want a pantry staple in your back pocket for those times you have leftovers and don’t know what to do, or simply have odds and ends that don’t quite seem to go together, then I submit this recipe. I hope you enjoy it!

You’ll Need (2 – 4):

2 cups chicken broth

1/2 cup of lentils (dry) or 1 cup cooked

1/2 cup of chickpeas, cooked

1/2 cup onion, chopped

2 tsps. cumin

4 tsps. salt

4 tsps. pepper

1 tsp. red pepper flakes

1 bay leaf

1 small handful of cilantro, chopped

1 handful of fresh spinach (optional)

Juice of half a lemon

2 tsps. olive oil

Heat a saucepan to medium with the oil and onions. Add the garlic, cumin, salt, and pepper to the vegetables and let the onions become translucent. When the onions et al are fragrant, add in the lentils, chickpeas, and bay leaf. Stir together and then add in the chicken broth. Stir again, reduce heat to medium-low and let the soup simmer until it just starts to bubble.

Add in the cilantro and let it wilt. Then, pour in the the lemon juice. Stir and let it heat for about two minutes, and then turn off the heat, and stir in the spinach. Serve hot and delicious!

I like this soup (as you can see from the photo) with a dollop of unsweetened non-dairy yogurt stirred into it, but it’s delicious on it’s own as well. It’s also really good with a nice dense piece of bread!

Additional Comments:

  • If you’re cooking the lentils in the soup, make sure you’ve rinsed them thoroughly in cold water, and then looked them over for small stones. Increase the amount of broth by 2 cups, and add the lentils with the broth second to last after frying the onions, spices, and bay leaf, cook for about 15 minutes before you add the cooked chickpeas. I don’t recommend cooking dry chickpeas and lentils together, as they have different cooking times.
  • If you can’t find spinach safe from corn-based derivatives (often they drink up fertilizers as well as water!) then try a green safe for your consumption. I have been doing okay with the spinach from my grocery store for now, but I also wash it very well and there’s no guarantee!
  • If you’re vegan/vegetarian, you can easily sub a vegetable broth for the chicken, and still have a delicious gluten-free soup.

Cucumber Tomato Salad

Sometimes what you need is a quick, bright splash of acid with a decent crunch, a salad to complement something fatty like lamb, or heavy like a red Thai curry. Also, sometimes you realize you have the end of one sad English cucumber and a box of cherry tomatoes you forgot about and it’s time to either fish or cut bait. And lo! A salad is born!

Winter is not my prime season for salads. If you live somewhere without the darkest days of the year (Say…California where it gets down to fifty and people reach for their woolens) you might not have the same urge to eschew all cold foods and sink into soups, stews, and baked sweet potatoes until you’re as fluffy as the mashed potatoes you just ate. I know they’re good for me, but they’re cold, and I’m cold; my core temperature is going to win out every time.

But when the weather starts warming up, my fickle eye turns towards fresh vegetables once more. This can be a bit tricky (when isn’t it when eating with food allergies?) because a lot of fertilizers or sprays that extend the life of fruits and vegetables can be derived from corn or soy. If you have a sensitive allergy, the produce section is always a minefield.

I don’t have a dedicated vegetable garden, so I rely on my local supermarkets. So far, it’s been without any incident. I’m always careful to go for foods that have some dirt on them, a sign that they probably haven’t been washed or sprayed with something to make them more attractive, and if there’s a rind I generally don’t eat it, even if it’s edible. Thus, I can still have apples and citrus fruits.

In regards to tomatoes and cucumbers, I’ve had good luck. I generally get tomatoes on the vine, though in this case we had a punnet of cherry tomatoes, and the cucumber came from Trader Joe’s so I felt a little better about my chances. As always, approach food from new places with caution until you’re sure you won’t be affected.

Back to the food, this salad has good sharp flavors that wake my tongue up from its winter slumber, and the acid from the rice wine vinegar makes a fantastic complement to the more subtle flavor of the cucumber. I like it with rice and curry, but you could also have it alongside a sweet potato and garlic spinach, or Lemon Paprika Chicken and rice stuffing. It punches up a heavy dinner or makes a great addition to a light lunch. I hope you like it!

You’ll Need (serves 2 -4):

1 English cucumber, diced

2-3 medium tomatoes or a good handful of cherry tomatoes, diced or sliced in half

2 – 3 Tbsp. olive oil

2 Tbsp. Rice Wine Vinegar

1 clove garlic, minced, or a good shake of garlic powder

1 green onion, diced (optional)

A good shake of sesame seeds (optional)

Salt and Pepper

Cut up your vegetables, and place them in a bowl or container with a tight lid. Add the oil, vinegar, salt and pepper. Close the lid on the bowl and give them a good shake so that everything mixes easily. Can be served immediately, or placed in the fridge to marinate. Lasts about a week, but I would recommend taking it out of the fridge a few minutes before serving, to allow the olive oil to become liquid again.

Building A Pantry: So Far, So Good

First of all, take a deep breath. I’ll do it, too!

There, now we can start. It’s so frustrating seeking an equilibrium between what we want to eat and what we can eat, and some of us have such a restricted diet that it barely seems worth the effort at all. Sometimes, I have texted my friends to remind me to have lunch simply because I was relegated to eating the same piece of bland chicken for every meal, and I was simply done. I was just over the entire experience; I didn’t want to eat anymore, and I certainly didn’t want to eat the same three foods over and over again. I did it anyway, as you can probably guess, but my relationship with food was pretty rocky there for awhile.

It took me a long time to get excited about food again–or at least it felt rather long to me, I love to eat!–But once my body stopped breaking out in hives and those hard bumples that itch and you can’t scratch them, and I started accepting my allergies as a new normal, I realized I needed a new strategy.

Enough with the self-defeat, and onward to the cookies!

As you can see from my top picture, my pantry is shared, which means there are a lot of items in it that I can’t eat (there’s even polenta! Really not my go to dinner, guys.) That changes what I do when I’m cooking, and when I’m thinking about what to buy. Not merely what I eat, but how it’s stored and what makes my food area as well as my food intake as safe as possible. What helped me start to think creatively about food again is because I decided to keep one thing in mind, and I’m going to share it with you: So Far, So Good.

Keep that phrase in mind, all right? It isn’t trite, and it isn’t meant to make you feel bad about what you’re not eating or what you can’t. The items you put in your pantry are the ones that allow you to eat without having a reaction, that work for you. No matter how restricted your diet: So Far, So Good.

We’re making our food spaces safe for us, in as much as we are able, and that’s no small feat. To help out, here are some steps you can take to begin building your pantry:

  • Take stock of all the items in the pantry.
    • All of them, from the 1/4 cup of mystery spice blend to the cans to the five pound bag of flour you just bought, because it’s time to put your literacy to the test, and read your labels. You need to know what you’re eating, even down to the hidden ingredients the companies put under more scientific names.
      • Pectin, for instance, is often derived from corn. That means I shouldn’t have anything with pectin in it, like jam or jelly. So all those delicious jars automatically belong to other people now!
    •  Everyone should also pay attention to the “may includes” printed in tiny fonts which I assume they all hope we’ll miss. If you have an allergy, and you see that little line on the back of the almond butter container: “May include…” or “Made in a facility that also processes…” then beware!
  • Consider the entire household
    • If you live with someone who isn’t allergic to what you’re allergic to, then you have to think about what that means for everyone in the house.
      • Is your allergy airborne?
      •  Can you handle the inevitable cross-contamination in a home kitchen?
        • It’s not always as simple as, for instance, making sure you grab the coconut milk creamer rather than the half ‘n half first thing in the morning. While you might get away with segregating items from each other, what does that mean for meals eaten together? If you do most of the cooking, can you cook using items you’re allergic to, or do you need to avoid skin contact?
  • Talk to people
    • Ask your doctor, or allergist, or speak with a nutritionist or dietician about maintaining a healthy diet with all the vitamins and minerals you need. Do you have to source supplements? 
    • Speak with your partner(s) or family members about what you’re going through, and think about what that means for yourself as well. I know it’s stressful, especially if you’re doing this in the middle of an elimination diet, or you’re reacting to something, but you have to come to grips with your food. We’ve all got to eat, and we might as well enjoy the experience.
  • Find a blog specific to your allergy!
    • Check out an allergy group on social media, or a website and get tips and support for what you need to look out for! No doubt someone can recommend a food item that’s safe for their use and might work for you as well. Building your pantry should be about minimizing risk and maximizing enjoyment.
  • Once you feel up to it, grab a box and put every item of food to which you’re now allergic inside of it.
    • All that food? If it’s unopened, give it to the nearest food bank. If it’s partially opened, it goes in the trash. Don’t finish something you’re allergic to! I felt tremendous guilt wading through my food and mentally tallying up all the money spent on things I couldn’t eat anymore. But what could I do? I couldn’t just keep eating it. My allergies are part of my new normal, and I had to take control of them by taking control of my food.
  • Make a list
    • What do you like to eat?
    • How can you make it now?
      • Let me tell you, realizing I had to give up a majority of Chinese food I didn’t make myself was a hard moment in this blogger’s life. Whither my Kung Pao Chicken? Whither…literally everything? But I did it. And I figured out what I could feasibly make within the parameters of my new life, bounded by my budget as well as my dietary needs.
    • Make a list of your favorite foods, including the ingredients.
      • Have a breakfast item, a lunch item, and something for dinner. Those foods are what you’re going to base your new pantry on, even if it’s six different ways to eat chicken. You can always add more as you gain confidence, but start small!

No one’s allergy free pantry looks the same, nor should it. Everyone’s allergies and sensitivities are different, and moreover, even those people with the same allergies can have different reactions to an identical product. If you have any concerns about a foodstuff, or you have a severe allergy, please talk over any change in your diet with a medical professional. I can only offer suggestions about foods strategies that work for me, and what works for me might not work for you!

Always play it safe!

That being said, however, if you want an idea of where to start in putting together a pantry of ingredients to pull out, then this is the post for you! Even if you can’t use the brands I mention, you can certainly figure out how to meld my pantry techniques with your food needs.

Vegan Pesto Pasta: The Oregonian Treat

All right, that isn’t a thing, and no one other than me probably remembers that Rice-A-Roni jingle, but the title made me laugh, so I’m using it. Ha!

I’m told traditional pesto has a great deal of cheese in it, and reading the labels of the little jars in the supermarket certainly bears that out. I’ll be honest, I bet it’s fabulous (my mother certainly agrees!) but since I can’t have it, I decided to come up with a version that would taste good to me and my family members whose bodies work properly. It’s been taste-tested numerous times as a quick, easy meal for a weekend lunch or dinner, when all anyone really wants to do is poke someone else until they’ll do the cooking. Got 10 minutes? You got a meal!

You’ll Need (serves 6):

1 bag of fresh spinach, washed and dried

1 big handful of fresh basil leave, washed and dried, or 2 Tbsps. dried basil

1/2 cup sunflower seeds, roasted in their own oil

1-2 large cloves of garlic

Juice from 1/2 of a lemon, or about 2 Tbsps.

Salt and Pepper to taste

Olive Oil (I tend to use 1/3 – 1/2 cup)

Put all the ingredients, except for the oil, into a food processor or blender, and turn the machine on to high. While it’s running, pour in olive oil. If the mixture begins to stick high up the sides, stop the machine, and push down the concoction so the blades can reach it. Turn it back onto high and keep adding olive oil until the whole thing looking like a sauce. Mine didn’t take more than five minutes (and quite possibly less!)

Turn off the machine and taste test it. Is it too sharp? Add more spinach. Does it need more salt? Add some. Sauces are really things that you have to make to your specific taste. I can’t add nutritional yeast to this, as people often do, because I get different answers to my allergy questions from within the same companies. That’s why I add lemon juice for brightness, but if you can eat nutritional yeast, then feel free to add a teaspoon or two for your own pleasure. Tell me how it tastes, I’ve always been curious!

To serve this, I made gluten free pasta. I drained it, and let the hot noodles cook the sauce a little to draw out the flavors. I didn’t reserve any of the pasta liquid, but if you’re eating traditional pasta, then you should absolute keep back a half a cup or so to meld the sauce with the starches.

I like this recipe. It’s got a wonderfully basil overtone, and I think the spinach gives it heft and body. The lemon and garlic give it an entirely unctuous quality, which I know sounds silly, but that’s how it tasted to me. Sometimes I’ll add shrimp if I’m quite hungry, but usually I just eat it plant-based, just as is. It’s lovely hot, or cold the next day.

Additional Comments:

Just to remind you, if you use bagged spinach, there’s a likelihood that you might accidentally have cross-contamination with a corn-based cleaning wash that they use on the loose leaves. If possible, try to get spinach that’s unbagged or from a brand you’ve used before and not reacted to. I also always thoroughly wash my vegetables, regardless if they say they’ve been pre-washed or not. I know it’s a hassle, but I always want people to be as safe as possible. If you have a very sensitive allergy, then this might not help you, but it works for me!

Citrus fruits can often have corn-based wax on their peels in order to lock in their freshness. I’m doing okay just peeling them and only having the juice or pulp. I never use lemon peel.

Fancy Oven-Cooked Steak Dinner

This one’s for my littlest brother, who loves a good steak dinner.  To be frank, I don’t eat a lot of red meat (I think I ate about…half of that steak in the above picture, and then spent the rest of the night groaning about how full I was!) because I spent some real difficult months where my body reacted to all meats that weren’t chicken with severe disapproval. I’ve gotten out of the habit almost entirely by now, and you’re far more likely to find me roasting a chicken or getting a nice piece of salmon. I do know how to cook a steak, however, and since I have family members that can eat what I cannot, I thought I’d share my recipe with you all!

If you have a lot of allergies, as I do, one of the aspects of food prep for any meal is often not simply knowing your ingredients, but know what your ingredients contain. Minced garlic from a jar isn’t simply minced garlic, but water, salt, and/or citric acid (corn!). Ground flour might have been passed through a grinder which just made Masa or TVP (corn and soy, respectively!) Worcestershire sauce might be perfectly fine in one batch, but contain an unfortunate preservative in the next. It’s the same if you’re eating meat.

If you can, ask your butcher if the steak you’re buying comes from corn-fed cows, especially if you’ve got a severe allergy. If it’s not, ask if they’ve been treated with any kind of preservative. Finally, and this one always makes me feel silly, but persevere and be picky! Try for the steak as far away from touching other foods in the display case as possible. You can always wash them later, of course, with cold water and a quick paper towel pat down to dry them, but it’s good to be assured that your meat hasn’t been cuddling up to something to which you might be allergic.

Steak is kind of a fancy meal, in my opinion, which is why I went all out with fancy hasselback potatoes and then brought us back to earth with simple roasted carrots. It’s something to bring out for the holidays and special occasions. I like my steaks to be spiced, but fairly plain, with good fat marbling through the meat. When you’re cooking a steak, the amount of time necessary depends on how thick the cut of meat is. The steak in the picture above is really thick, so rather than risk burning it, I seared on the stovetop and finished it in the oven.

You’ll Need (1-2 servings, depending on appetite!):

1 steak, about 8 oz.

Salt, to taste

Black Pepper, to taste

¼ tsp. garlic powder, or one cut, raw clove for rubbing

¼ tsp. onion powder

1 tsp. olive oil

Take your steak out and coat it in your seasonings on both sides of the meat. If you’re using a raw garlic clove, rub the cut end all over the garlic (don’t be afraid to press down, but don’t leave little pieces of garlic to burn on it). Leave it alone while you heat up a pan on the stove.

Heat the pan on medium until a little bit of water spritzed on the surface makes the droplets skitter and dance. Then rub olive oil on the steak, again on both sides. Turn on your stove’s fan, and/or open a window because it’s about to get steamy and smoky in there!

Preheat your oven to 350F.

You judge the time to cook by the steak’s thickness; I use the rule of my thumb. If the steak is as thick as your thumb, cook it for 2-3 minutes each on both sides. If the steak is thicker, say as thick as the length of your forefinger, cook it for 3-4 minutes on either side in your pan.

If you’re using an oven-safe pan, transfer the whole thing into the oven and cook it for around 10-20 minutes, depending on how rare you want your meat. If you’re not using an oven-safe pan, then you can use a jelly roll pan covered in aluminum foil or any tray with a lip to cook the meat for the same amount of time. I don’t recommend using a casserole dish, because the sides are too big and might trap moisture you don’t want.

Take the meat out and rest it for 10-15 minutes.  Then get out a good strong knife and serve!

Building Block: Homemade Tomato Ketchup

If you have an allergy, shopping at the supermarket can be a little more fraught with pitfalls than your average consumer, and you can’t always escape that desperate scroll through a laundry list of ingredients by going to a farmer’s market or signing on for a CSA. A lot can depend on how a food item is stored or processed, what it’s been sprayed with, and even what field the food is near (I’m looking at you, raw honey!). In short, finding food that’s safe for you and your family when there’s a food allergy in play can be a lot of ‘trial’ as well as the horrible frustration of a whole lot of ‘error.’

How this works out for me, is that there are many store-made foods I just can’t have, even when the ingredients list works in my favor. Soup stock, alternative milks, and many condiments are on this list, and even though I’m still trying to find some of these items, there is simply no guarantee that I’ll succeed.

Thus, I have brought to you today….a recipe for ketchup! No, I know! Actual ketchup! It’s a thing you can make!  I was also surprised. There are just some foods that you don’t think about cooking up until fate or craving sort of forces you into scouring your bookshelf for incredibly old recipes.

Many of those recipes resembled something more like the Brown Sauce you find in the UK, or like a thickened version of Worcestershire Sauce which wasn’t what I wanted at all. In my head, ketchup is a tomato-based delight, slightly sweet, but with an underlying tart saltiness and a smooth thickened texture. I wanted a sauce I could drag a fry through and have it come out clinging to the potato rather than drip off the side, if you know what I mean.

Finally, I settled on an approximation of all the recipes I had seen, only drastically reduced because if I failed at this recipe, I didn’t want to be saddled with cup after cup of some nasty tasting marinara. So I made some substitutions, did some highly suspect math, and complained endlessly to my friends via text that I was going to burn my ketchup like some city slicker who just arrived on the prairie. I could sense the ghosts of my ancestors rising up to judge me (my grandmother, in particular, just wanted me to keep trying with store-bought.)

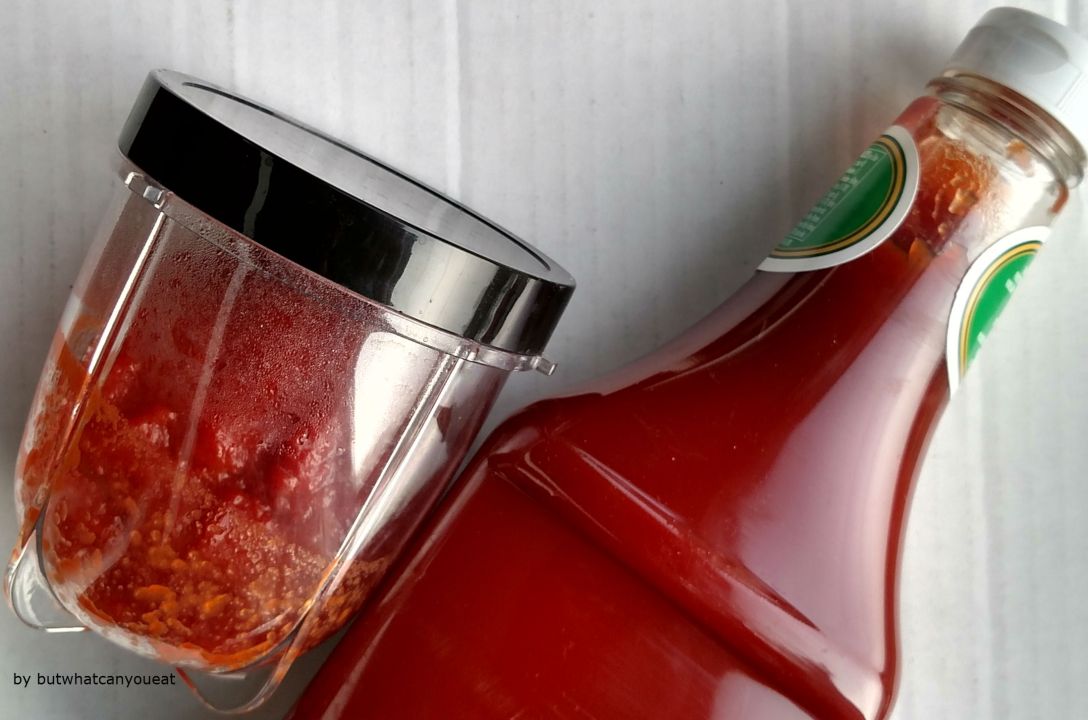
Short story, I did not burn anything! (I did take about a ½ inch of skin off my ring finger, but that’s an unrelated incident). And the result was…ketchup! Actual, real-tasting, tried and true tomato ketchup! I felt so accomplished, I can’t even tell you.

But it also impressed upon me how much time and investment making ketchup is. A little over two pounds of tomatoes produced ½ cup of actual ketchup. All the recipes I found called for immense amounts of ingredients, at a cost today which most people (including me) might honestly find prohibitive, not just in money, but in time spent cooking. That’s the trade off with a lot of allergy-friendly products: what others can just pluck off the shelf, we have to devote time and thought and money to achieving.

So this is my admittedly delicious, but scaled down recipe for tomato ketchup. It’s easily adjusted to create more, but I honestly recommend creating a small batch of the stuff—as I did—to make sure you like the flavor and want to devote the time to making the product. I think making this recipe greatly increased my confidence in the kitchen (I made a condiment! Me!). It feels really good to know that I can still have something, even if all the store-bought varieties so far make me itch.

You’ll Need (serves 1):

~2 lbs. tomatoes

water, for boiling

¼ cup apple cider vinegar

1 large clove garlic

1 tsp. white sugar

¾ tsp. salt

1/8 tsp. nutmeg

¼ tsp. onion powder

1/8 tsp. paprika

Wash your tomatoes and add them to a large pot with a lid. Pour in enough water to cover the tomatoes, and then bring them to boil on the stove top. Once the tomatoes have split, remove from the stove and drain the water.

Using a fine mesh strainer and a spoon, or a berry press, press the juice and pulp out of the tomatoes back into the pot you just used. Make sure to scrape the bottom of the strainer to get all the good stuff!  Add in all the rest of the ingredients, and then reduce the sauce on low to medium-low for three hours, or until the sauce resembles ketchup. It should be thick enough to part with a spoon and it should definitely stick to the back of said utensil. Stir frequently to make sure that the sugars don’t burn. Allow it to cool completely before putting it into the refrigerator.

Additional Comment:

Around 2 lbs. of tomatoes yielded ½ cup of ketchup.

If you’re scaling up this recipe, please remember that this is a heavily reduced condiment so all the flavors will be quite concentrated. Less is definitely more!  Also, if you’re worried about the amount of nutmeg, try substituting with mace instead.